
Saturday, April 23, 2011
Pro Staff, No, Really
Well, I have been doing quite a bit lately on my lures, both originals or repaints, and I am happy to say that many have found new homes. From North Carolina to California, from Alabama to Wisconsin to New York and several states in between, people have ordered lures painted in the baitfish patterns of their area or one of my collectible lures. Some are already in use for stripers down south and others are in the waiting stage for water conditions to warm. I can’t thank everyone enough for your support on this new venture and I want to introduce you to a couple of guys that are helping me out and keeping my chin up. There are many more I owe thanks to but this is for Gary and Joe and how a simple request by Joe turned into what I hope is a way to say a thanks and keep getting help from some great fishermen.
As I started writing posts about my cedar lures one of my friends on Twitter, Gary Hanson ( @mgaryhanson on Twitter ), was the first to order one of my baits. Before he was done he had asked for several more and had me paint some other lures in a pattern that he just knew would work in his waters. I modified this one a bit from an artist’s point of view and now it is available as a standard pattern named Gary’s Golden Shiner. Does it work? Why yes, yes it does and here is the proof from Gary’s first two trips to Logan Martin at his favorite striper spot.


We talked about other colors that show up in baitfish which led to a new shad pattern which is now in my line and is available for order on any bait. He also got me thinking about another shape to use for when a quieter approach is needed. That one is still being tested and looks promising. Other modifications we have talked about are in the works.
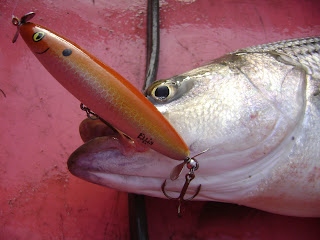
On the other side of the country and fishing salt water is Joe Sarmiento ( @socalsalty on Twitter ) who ordered a couple of poppers from me. We talked quite a bit and he helped me to start figuring out what salt water anglers needed in a bait to hold up to tough conditions. This part I am still working on along with help from some other great guys like Jason DeCarlo since I am 8 hours from the ocean I didn’t know what they needed. Joe is going to be testing salt water lures and telling me what needs to happen to make them better and what baitfish are in the area. His first two are in mackerel and anchovy which have some changes I want to try to see why they don’t work.


As we talked Joe said (probably as a joke) he wanted to be on my Pro Staff. Not realizing I had a Pro Staff I laughed and said sure. Joe said if he was going to be on it then Gary had to be on it and I needed to tell him. I thought that was a great idea since Gary has been the most help in design and in showing off my work and both of these guys fish, a lot. I said I guess now we would need t shirts so they could wear them when they head to the water as big time Pro Staffers.
Gary and Joe, along with several others, have been great support and a huge help in giving me ideas for colors and shapes and if they want to be included in what I do that is the least I can do in return. Things are moving along with this project and having support from everyone makes it easier to head to the shop or sit behind my airbrush.
So to Gary and Joe, thanks for everything and now we have a Pro Staff but still no t shirts.
If you are on Twitter give these guys a follow you won't be sorry.
Here is a link to Joe’s blog. Give him a follow to keep up with all the happenings in Lower California.
http://socalsalty.wordpress.com/
As I started writing posts about my cedar lures one of my friends on Twitter, Gary Hanson ( @mgaryhanson on Twitter ), was the first to order one of my baits. Before he was done he had asked for several more and had me paint some other lures in a pattern that he just knew would work in his waters. I modified this one a bit from an artist’s point of view and now it is available as a standard pattern named Gary’s Golden Shiner. Does it work? Why yes, yes it does and here is the proof from Gary’s first two trips to Logan Martin at his favorite striper spot.


We talked about other colors that show up in baitfish which led to a new shad pattern which is now in my line and is available for order on any bait. He also got me thinking about another shape to use for when a quieter approach is needed. That one is still being tested and looks promising. Other modifications we have talked about are in the works.
On the other side of the country and fishing salt water is Joe Sarmiento ( @socalsalty on Twitter ) who ordered a couple of poppers from me. We talked quite a bit and he helped me to start figuring out what salt water anglers needed in a bait to hold up to tough conditions. This part I am still working on along with help from some other great guys like Jason DeCarlo since I am 8 hours from the ocean I didn’t know what they needed. Joe is going to be testing salt water lures and telling me what needs to happen to make them better and what baitfish are in the area. His first two are in mackerel and anchovy which have some changes I want to try to see why they don’t work.


As we talked Joe said (probably as a joke) he wanted to be on my Pro Staff. Not realizing I had a Pro Staff I laughed and said sure. Joe said if he was going to be on it then Gary had to be on it and I needed to tell him. I thought that was a great idea since Gary has been the most help in design and in showing off my work and both of these guys fish, a lot. I said I guess now we would need t shirts so they could wear them when they head to the water as big time Pro Staffers.
Gary and Joe, along with several others, have been great support and a huge help in giving me ideas for colors and shapes and if they want to be included in what I do that is the least I can do in return. Things are moving along with this project and having support from everyone makes it easier to head to the shop or sit behind my airbrush.
So to Gary and Joe, thanks for everything and now we have a Pro Staff but still no t shirts.
If you are on Twitter give these guys a follow you won't be sorry.
Here is a link to Joe’s blog. Give him a follow to keep up with all the happenings in Lower California.
http://socalsalty.wordpress.com/
Sunday, April 17, 2011
Tiny Plots Big Results

After the great response on Growing Local I decided to revisit food plots to show some pics of how I do mine. I am, by no means, an expert, this is simply how I have done mine from the first till now. At first I added some of the big commercial brands but it didn’t take long to realize at least half of each bag wasn’t germinating while seed I purchased for our area did. All of the big plots had some fertilizer added since I had no way to add manure and compost over time to build the soil naturally. Fertilizer does make plants grow rapidly but is hard on soil doing damage by killing good bacteria which plants need. Don’t believe it?
Think about how many times you hear someone say, “I just fertilized and I will have to go back and do it again in a month or two when the plants slow down.”
The reason is the soil is being damaged and the plants are basically addicted to fertilizer to live. Soil amendment through natural means on larger scales is beyond most of us so use your fertilizer sparingly when you can to keep damage to a minimum while still providing for your plants. Ok, enough of that, on with the pics
This is my first plot in Rutherford county TN, I used 200 lb of fertilizer on 1/8th acre since we had it and this spot hadn’t been amended in 20 years. It was planted in brassicas, clover, Austrian peas, and a few others I can’t remember. It wasn’t big but looked good.


These plots were in Cheatham county TN, they were planted only using seeds bought from our local Co-Op and Hooper’s Supply with a little fertilizer added since the soil was so poor and they were last minute plots. It was only the second time I ever had a tractor available to till my plots. These turned out ok. I planted four on 26 acres but lost one to flooding which also damaged a second. The other two which were on top of hills did pretty well.


Next are plots that I plant in a lot of areas, small hidden away places that I work with very few tools. Most never see a tiller. I go in with a line trimmer, rake and limb saw to clear a spot. These are in Marshall county TN. First I remove branches for sun to get in and make shooting lanes. Do your shooting lanes now so you don’t have to come in later and disturb anything. Take out more than you think you need to, it will pay off. Then trim all weeds as close to ground level as you can. I use a garden rake to scratch the ground where I can then broadcast seeds. In these spots I use a lot of wheat, rye and turnips. Chicory, rape or kale might work in your mix, too. Try to plant when rain is expected in a day or two so seeds germinate and birds have less time to eat your investment.


For mineral licks I use blocks I buy at Co-Op or TSC for $6.50 for a 50 lb block. They contain all of the trace minerals deer need at a fraction of the cost of name brands. I know folks don’t like this part but just read the labels and compare, I did. Either chuck them out whole or whack them with a hammer to make smaller chunks to spread in several locations. I don’t dig holes although some folks do but the deer will dig one for you soon enough if you just put blocks on the ground. I like putting them on a stump if I can find one, the minerals leach into the wood and deer will chew on the stump.


Except for mineral blocks I won’t offer any advice on what you should use. Where you live, where you plant, what you expect are all factors you need to consider. The simple ideas I use work no matter where you are and I wanted to give folks a second look at plots I have done to show it doesn’t take huge budgets or equipment. Most of us aren’t big time hunters getting handouts from sponsors to show off products. We are people that have very limited time and budgets that simply want to improve our hunting where we can.
If you have the tools I mentioned, a little spot to plant and in many cases no more than $50 plus some sweat equity you can do these plots and get results.

Wednesday, April 13, 2011
Past and Future
I wasn’t planning to do another woodworking post but several folks liked this piece so I thought I would pass it along. Most of you know by now I am a firm believer in using what is at hand and this is a good example of going into the yard (well, at my house at least) and making something useful. The parts for this would be considered scrap or firewood by most people, in fact, the walnut was saved from a firewood stack while the Osage orange was laying in my yard. You could do this with hand tools but I have a few bigger toys that make it a bit faster.
As I talked with a couple of friends on Twitter about traditional archery, the subject of Osage orange being used for making a bow came up, this led to @ILCornfed asking if I could do a striker for a turkey call out of it. While I was working at the lathe turning some lures I had time to think about it and realized it could work. I had a small section of Osage that could be split and rescued walnut was sitting there all I had to do was turn the parts.
I took a chunk of Osage to work down first since if it failed there was no reason to do the top. Using a micrometer to check the thickness of one of my strikers I found out how small it needed to be. The one I used as a guide was 8 mm across and about 4-5” long. I chucked the first piece on the lathe and started cutting it down. I was surprised by how easy it worked. It didn’t take long to get it close to where it needed to be. I stopped to check it several times at this stage because it was pretty skinny. The simplest way for me to get it right was to use a parting tool at each end to turn down to the diameter I needed then cut the rest down with a bull gouge. When it was close I used a flat scraper to smooth the ridges out and then sanded it with 100 to 220 grit paper. After sanding I cut the ends off on the bandsaw then rounded one end with the disc sander and padded nail files.

For a first attempt at a top I used a piece of oak I found laying in our discard pile. Neighbor Don had tried to turn this oak but it wouldn’t turn, just made a mess. I tried to tell him to speed the lathe up but he thought slower would work. When I tried I used a faster speed and it cut like butter. After rounding it I measured a section 3 ½” long to taper using my store bought striker as a guide and Mark 1 eyeball to match it I got started. Since it was just a simple taper it only took a couple of minutes to turn and sand. Before I cut the ends off I used a small drill bit to put a pilot hole in the end where the osage would be added by simply drilling where the lathe spur had made a hole. This shows you the exact center of your work piece and makes it easier to enlarge the hole when you add the striker end. I matched the Osage piece to a drill bit then enlarged the hole to fit, cut the scrap ends off and sanded.

After getting the pieces ready I did a test fit to be sure I had things close. With the parts together I used one of my slate calls to see how it would sound. It was cool to hear it for the first time even though it was a bit too deep of a tone. I thinned the tip some by sanding to tune it to a higher pitch and that worked like a champ. This is when I thought about the walnut stacked outside.
I went out, found a likely looking piece and headed to the bandsaw for a bit of trimming. I crosscut a section about 5” long and got it on the lathe to commence with more turning. Since I had done one it didn’t take long to do the second one but I couldn’t leave it plain. I used a diamond parting tool to cut lines then used a bit of wire to burn the lines to darken them. I sanded this piece using 100 to 500 grit paper then drilled and trimmed it like the oak. I used a bit of wood glue to join all the parts and set them aside to dry. After they dried I applied a natural color stain to everything except the last 3/8” at the striker tip. I left this unstained so it wouldn’t affect the sound and could be sanded when needed.

 The tip is not lined up in the pic since it wasn't glued in yet.
While I have quite a bit of store bought equipment around I am trying to produce things that I can be proud to say are one of a kind and work. I want to be able to provide the people that order from me items they can show off to friends and say that they have the only one exactly that shape or color. I never use templates when I turn, only rough plans when I build and no formulas when I paint. I couldn’t do two things exactly the same even if I wanted to. As I get older the things that our grandparents or great grandparents had and did are starting to mean more to me as I watch people drool over another mass produced item that anyone can buy. Are they good? For the most part, yes. Are they just alike? Yep. I remember a time when folks were more individual and what they used showed that side of them in its' quality and artistry which is what I want to provide.
I hope you give building something of your own a try. When we are all gone these are things hopefully that get passed along with stories of how Granma or Granpa made this, taught me how to use it and make my own so it all starts again.
If you would like to order an item or if you have a question you can contact me at ghost1066@gmail.com
As I talked with a couple of friends on Twitter about traditional archery, the subject of Osage orange being used for making a bow came up, this led to @ILCornfed asking if I could do a striker for a turkey call out of it. While I was working at the lathe turning some lures I had time to think about it and realized it could work. I had a small section of Osage that could be split and rescued walnut was sitting there all I had to do was turn the parts.
I took a chunk of Osage to work down first since if it failed there was no reason to do the top. Using a micrometer to check the thickness of one of my strikers I found out how small it needed to be. The one I used as a guide was 8 mm across and about 4-5” long. I chucked the first piece on the lathe and started cutting it down. I was surprised by how easy it worked. It didn’t take long to get it close to where it needed to be. I stopped to check it several times at this stage because it was pretty skinny. The simplest way for me to get it right was to use a parting tool at each end to turn down to the diameter I needed then cut the rest down with a bull gouge. When it was close I used a flat scraper to smooth the ridges out and then sanded it with 100 to 220 grit paper. After sanding I cut the ends off on the bandsaw then rounded one end with the disc sander and padded nail files.

For a first attempt at a top I used a piece of oak I found laying in our discard pile. Neighbor Don had tried to turn this oak but it wouldn’t turn, just made a mess. I tried to tell him to speed the lathe up but he thought slower would work. When I tried I used a faster speed and it cut like butter. After rounding it I measured a section 3 ½” long to taper using my store bought striker as a guide and Mark 1 eyeball to match it I got started. Since it was just a simple taper it only took a couple of minutes to turn and sand. Before I cut the ends off I used a small drill bit to put a pilot hole in the end where the osage would be added by simply drilling where the lathe spur had made a hole. This shows you the exact center of your work piece and makes it easier to enlarge the hole when you add the striker end. I matched the Osage piece to a drill bit then enlarged the hole to fit, cut the scrap ends off and sanded.

After getting the pieces ready I did a test fit to be sure I had things close. With the parts together I used one of my slate calls to see how it would sound. It was cool to hear it for the first time even though it was a bit too deep of a tone. I thinned the tip some by sanding to tune it to a higher pitch and that worked like a champ. This is when I thought about the walnut stacked outside.
I went out, found a likely looking piece and headed to the bandsaw for a bit of trimming. I crosscut a section about 5” long and got it on the lathe to commence with more turning. Since I had done one it didn’t take long to do the second one but I couldn’t leave it plain. I used a diamond parting tool to cut lines then used a bit of wire to burn the lines to darken them. I sanded this piece using 100 to 500 grit paper then drilled and trimmed it like the oak. I used a bit of wood glue to join all the parts and set them aside to dry. After they dried I applied a natural color stain to everything except the last 3/8” at the striker tip. I left this unstained so it wouldn’t affect the sound and could be sanded when needed.


While I have quite a bit of store bought equipment around I am trying to produce things that I can be proud to say are one of a kind and work. I want to be able to provide the people that order from me items they can show off to friends and say that they have the only one exactly that shape or color. I never use templates when I turn, only rough plans when I build and no formulas when I paint. I couldn’t do two things exactly the same even if I wanted to. As I get older the things that our grandparents or great grandparents had and did are starting to mean more to me as I watch people drool over another mass produced item that anyone can buy. Are they good? For the most part, yes. Are they just alike? Yep. I remember a time when folks were more individual and what they used showed that side of them in its' quality and artistry which is what I want to provide.
I hope you give building something of your own a try. When we are all gone these are things hopefully that get passed along with stories of how Granma or Granpa made this, taught me how to use it and make my own so it all starts again.
If you would like to order an item or if you have a question you can contact me at ghost1066@gmail.com
Monday, April 4, 2011
Oak and Walnut Transformed Pt 2
Well after a delay longer than I planned I finally got to finish up my rod rack. Don’t know what I was waiting on since it only took about an hour to have it ready to put back together. Anyway here are the final few steps in our rod rack as furniture project.
I started with the idea to use scrap wood to do a budget build but my buddy over at http://www.funcfish.com/ beat me to it and did a great job so there was no need for me to do it again. This build used the same idea, materials already in the shop, yes I have a lot of stuff available, to create something nice enough to bring inside not leave in the garage. With the help of my neighbor’s shop and wood supply I was able to do this project for zero cost. All materials were leftovers from previous projects, wood rescued from various places or bulk buys from auctions at very low cost long since recouped.
Getting back into the shop I had to decide where to drill holes for rods to sit. I measured the top board from the end to find the exact middle then working toward each end, put a mark every 5 inches ending up with 7. There is no reason for putting them at this spacing other than it looked good. This spacing will allow me to add a series of holes on the other side if I want to add more rods. If I do I will offset the holes to provide more room for the reels on the lower shelf. I measured in from the edge 1 ½ inches and using a center punch made a small hole to guide a 1” forstner’s bit to drill each hole using a drill press. Be sure and drill from the top and put a board under your work piece to minimize tear out. By drilling from the top any tears will be hidden underneath. Next I cut a half inch slot for each hole using a square to guide my Japanese handsaw, you could use a jig saw or another type of handsaw but I have this one and it is great for cuts like this. This finished the top shelf except for a final sanding.

 Drill press with Forstner's bit and backer board. Oh and a cluttered workbench.
The trim added to the top of each side piece needed shaping on each corner plus the walnut was too wide and had to be sanded to blend with the oak. I shaped the corners on my bench top belt/disc sander, I had considered a bunch of ways to layout the curve but in the end just eyeballed it. To cut down the extra width I used a palm sander with 60 grit paper to get it close then switched to100 grit. I used 220 grit paper for a final sanding and to round over any edges on all of the pieces. Everything was wiped down with a tack cloth to remove dust to get ready for stain.
 Belt/disc sander and my Japanese saw. I love this saw it was sent from Tokyo by a friend.

To keep the contrast high between the two colors of wood I decided to use walnut stain on the trim pieces but just a natural stain on the oak. To do this I used a small cloth folded into a point to carefully apply stain to all trim pieces first. Take your time so you don’t get dark stain on the lighter oak. If you do lightly sand it using a small piece of 400 grit after the walnut stain dries so you don’t contaminate the trim pieces with dust. After the walnut is done I used a cloth to apply the natural stain to the oak. I like to use old t-shirts since they tend to be lint free and soft to keep the streaks down. This goes fast since I use a product that is stain and polyurethane in the same can.
 End details with walnut pegs in mortises.
The last step is to cut some small pieces of cedar to hold the rods in place, just in case. You could use more walnut which would look good but I was lazy and used a piece of cedar already milled to the size I needed I found laying on a work bench. I had several ideas on how to keep the rods in place but this one was the fastest so it won out. Each cedar piece was finished with the natural stain and there we have it, finally finished. I realized as I loaded the pictures I left these out but you get the idea.
 And finally the finished piece.
This is an old form of joinery which I have been fascinated with for years. The idea that simple friction will hold a piece of furniture together is just cool stuff. Yes it does take a bit of fitting but in the end you have no nails or screws to hide plus it can be taken apart if you have to move or ship it.
This rod rack can be built with nothing but a few hand tools and a bit of space to lay things out. I’m lucky to have access to tools, two shops and a large quantity of lumber but I have done things like this with much less. One bit of advice on lumber, if you look you might find a sawmill close that you never paid attention to. We make regular visits to several in our area and buy wood at a tiny fraction of what it would cost at a lumber yard or box store. It takes more work to get it ready to use but the savings are huge. Don and I just made three tables from wood saved from a burn pile at Trott’s Mill where a truck load cost us $10.00. Except for the attachments for the legs the cost was pennies for each one. These will sell in the $100.00 range for a total cost to us of under $5.00 each.
Hope you enjoyed a bit more woodworking, thanks for taking some time to check it out.
I started with the idea to use scrap wood to do a budget build but my buddy over at http://www.funcfish.com/ beat me to it and did a great job so there was no need for me to do it again. This build used the same idea, materials already in the shop, yes I have a lot of stuff available, to create something nice enough to bring inside not leave in the garage. With the help of my neighbor’s shop and wood supply I was able to do this project for zero cost. All materials were leftovers from previous projects, wood rescued from various places or bulk buys from auctions at very low cost long since recouped.
Getting back into the shop I had to decide where to drill holes for rods to sit. I measured the top board from the end to find the exact middle then working toward each end, put a mark every 5 inches ending up with 7. There is no reason for putting them at this spacing other than it looked good. This spacing will allow me to add a series of holes on the other side if I want to add more rods. If I do I will offset the holes to provide more room for the reels on the lower shelf. I measured in from the edge 1 ½ inches and using a center punch made a small hole to guide a 1” forstner’s bit to drill each hole using a drill press. Be sure and drill from the top and put a board under your work piece to minimize tear out. By drilling from the top any tears will be hidden underneath. Next I cut a half inch slot for each hole using a square to guide my Japanese handsaw, you could use a jig saw or another type of handsaw but I have this one and it is great for cuts like this. This finished the top shelf except for a final sanding.


The trim added to the top of each side piece needed shaping on each corner plus the walnut was too wide and had to be sanded to blend with the oak. I shaped the corners on my bench top belt/disc sander, I had considered a bunch of ways to layout the curve but in the end just eyeballed it. To cut down the extra width I used a palm sander with 60 grit paper to get it close then switched to100 grit. I used 220 grit paper for a final sanding and to round over any edges on all of the pieces. Everything was wiped down with a tack cloth to remove dust to get ready for stain.


To keep the contrast high between the two colors of wood I decided to use walnut stain on the trim pieces but just a natural stain on the oak. To do this I used a small cloth folded into a point to carefully apply stain to all trim pieces first. Take your time so you don’t get dark stain on the lighter oak. If you do lightly sand it using a small piece of 400 grit after the walnut stain dries so you don’t contaminate the trim pieces with dust. After the walnut is done I used a cloth to apply the natural stain to the oak. I like to use old t-shirts since they tend to be lint free and soft to keep the streaks down. This goes fast since I use a product that is stain and polyurethane in the same can.

The last step is to cut some small pieces of cedar to hold the rods in place, just in case. You could use more walnut which would look good but I was lazy and used a piece of cedar already milled to the size I needed I found laying on a work bench. I had several ideas on how to keep the rods in place but this one was the fastest so it won out. Each cedar piece was finished with the natural stain and there we have it, finally finished. I realized as I loaded the pictures I left these out but you get the idea.

This is an old form of joinery which I have been fascinated with for years. The idea that simple friction will hold a piece of furniture together is just cool stuff. Yes it does take a bit of fitting but in the end you have no nails or screws to hide plus it can be taken apart if you have to move or ship it.
This rod rack can be built with nothing but a few hand tools and a bit of space to lay things out. I’m lucky to have access to tools, two shops and a large quantity of lumber but I have done things like this with much less. One bit of advice on lumber, if you look you might find a sawmill close that you never paid attention to. We make regular visits to several in our area and buy wood at a tiny fraction of what it would cost at a lumber yard or box store. It takes more work to get it ready to use but the savings are huge. Don and I just made three tables from wood saved from a burn pile at Trott’s Mill where a truck load cost us $10.00. Except for the attachments for the legs the cost was pennies for each one. These will sell in the $100.00 range for a total cost to us of under $5.00 each.
Hope you enjoyed a bit more woodworking, thanks for taking some time to check it out.
Subscribe to:
Posts (Atom)
About Me

- Tommy Ellis
- Born and raised in middle Tennessee.I'm a working wildlife and landscape artist specializing in watercolors. Now making cedar lures and custom turkey calls.

