
Showing posts with label woodworking. Show all posts
Showing posts with label woodworking. Show all posts
Tuesday, May 17, 2011
Turning Freedom
Sorry for the gap in posts but I was down for over a week with an attack of vertigo. Good times. Like being on carnival rides without leaving home. Wobbling, falling, tripping on stuff and with throwing up optional.
As I sat around trying to get my eyes to focus and get a few lures painted and shipped I really didn’t feel much like writing. Since I was stuck in the house I didn’t have much to write about anyway. Then I went to the Post Office and while trying to figure out the most cost effective way to send something the man helping me asked what I was sending, when I said fishing lures that was all it took. Now I had my story to pass along, one worth telling, that means something and one everyone should find a small way to help with. Please, indulge me while I climb on my soapbox for a bit which I try not to do.
As we tried to get my stuff shipped, David, who works at the PO, mentioned he was a woodworker, too. When he found out I turned my lures on a lathe he invited me to his shop only a few minutes from me. As we talked about what we made he said he was involved, along with many others, in the Freedom Pen project. If you have never heard of this here is the short version, wood turners across the states donate time, money and materials to turn custom ink pens that are then shipped to our combat troops stationed around the world. This is an organization that has been around for 7 years now and many people have never heard of. As soon as I heard what they did and had the chance to go learn to make pens so that I could help I couldn’t wait. I told David that I would be over in a couple of days to see how they were made thinking the whole time that I needed to pass this along.
When I got to his shop there was one other turner there. This was Keith who had driven an hour and a half bringing pen blanks along with him. Later Lewis joined us with even more blanks and an amazing collection of pens he had turned. These guys are just a few that have taken this to heart, to send a small bit of home and a thank you to our troops.
We talked for awhile about what we turned, different materials, shows and sales then they started teaching me how to make pens. I love to turn but never claim to be all that good, I know how to do what I do but love to learn new techniques. We picked out some blanks then went through the process of getting everything set up, turned, finished and finally assembled. This is the results of my first attempt.

We didn’t get much turning done since they were spending more time explaining things to me but the results of some of David’s work was there waiting to head home with Keith to be added to the pens being sent to the troops. In this shipment were 20 pens he had ready in a variety of materials mainly turned in one style. The people turning think about the people using these and make them to fit inside the narrow sleeve pockets many use on their uniforms. Just another bit of care these folks put into what they are making.
 Mini Jet Lathe loaded with Osage Orange blanks.
 Assembly area.
Well, enough about our day in the shop, this is about what these folks are doing and more importantly, who is getting the pens they make. We have troops stationed in combat areas all over the world. They do a dangerous job under hard conditions with no where near enough contact with home. Simple things that they receive means a lot to them from cards sent by school kids to packages from family, these are things that let them know we care and they aren’t forgotten. This is the idea behind the Freedom Pens project. People from across the nation provide materials, time, talent and yes, money, to send what is a simple thing to us to our people in the field. While it is a pen and some people think, ”So what?”, it is much more. When you are out where they are and receive something hand made from home it tells them we are thinking about them, hoping they are safe and come home that way. Then add the fact that it comes from someone you never heard of, may never meet but thought enough of you and your job to make it for you just to say thanks.
So here is the organization that started it Freedom Pens if you would like more information and history. This is one of those ideas that you can help with if you never walked into a wood shop in your life. Almost every one of us has family or friends that serves or has served and they deserve our support. Pen kits used in making these aren’t terribly expensive but have to be paid for as do packing materials and shipping. If you can give a few dollars to help a group in your area, please, do. These people are doing all they can and many don’t have much money to give away. What they do have is everything else in their shops it takes to make the pens and small donations can provide enough kits for this project to keep moving forward.
If you can help with the cost of a trip to grab a hamburger this will provide several kits to a turner. Any amount helps any organization with their project but since, at least locally, I have seen no administration costs of any kind all money donated here pays for materials. I’m sure this is the case wherever this is being done since it is all about the troops not making a penny from it. If you can donate a couple of dollars to this project I hope you will it means a lot to someone you may never meet but deserves our thanks.
And with that I will leave you with a few pictures from David’s shop while stepping down from my soapbox.
 This is Lady who lost an eye and has been shot but is one of the sweetest girls around.
 L-R David, Lewis in back and Keith.
 David with a few of the pens heading overseas.
 Pens headed to the troops. Sorry for the flare in the pic.
As I sat around trying to get my eyes to focus and get a few lures painted and shipped I really didn’t feel much like writing. Since I was stuck in the house I didn’t have much to write about anyway. Then I went to the Post Office and while trying to figure out the most cost effective way to send something the man helping me asked what I was sending, when I said fishing lures that was all it took. Now I had my story to pass along, one worth telling, that means something and one everyone should find a small way to help with. Please, indulge me while I climb on my soapbox for a bit which I try not to do.
As we tried to get my stuff shipped, David, who works at the PO, mentioned he was a woodworker, too. When he found out I turned my lures on a lathe he invited me to his shop only a few minutes from me. As we talked about what we made he said he was involved, along with many others, in the Freedom Pen project. If you have never heard of this here is the short version, wood turners across the states donate time, money and materials to turn custom ink pens that are then shipped to our combat troops stationed around the world. This is an organization that has been around for 7 years now and many people have never heard of. As soon as I heard what they did and had the chance to go learn to make pens so that I could help I couldn’t wait. I told David that I would be over in a couple of days to see how they were made thinking the whole time that I needed to pass this along.
When I got to his shop there was one other turner there. This was Keith who had driven an hour and a half bringing pen blanks along with him. Later Lewis joined us with even more blanks and an amazing collection of pens he had turned. These guys are just a few that have taken this to heart, to send a small bit of home and a thank you to our troops.
We talked for awhile about what we turned, different materials, shows and sales then they started teaching me how to make pens. I love to turn but never claim to be all that good, I know how to do what I do but love to learn new techniques. We picked out some blanks then went through the process of getting everything set up, turned, finished and finally assembled. This is the results of my first attempt.

We didn’t get much turning done since they were spending more time explaining things to me but the results of some of David’s work was there waiting to head home with Keith to be added to the pens being sent to the troops. In this shipment were 20 pens he had ready in a variety of materials mainly turned in one style. The people turning think about the people using these and make them to fit inside the narrow sleeve pockets many use on their uniforms. Just another bit of care these folks put into what they are making.


Well, enough about our day in the shop, this is about what these folks are doing and more importantly, who is getting the pens they make. We have troops stationed in combat areas all over the world. They do a dangerous job under hard conditions with no where near enough contact with home. Simple things that they receive means a lot to them from cards sent by school kids to packages from family, these are things that let them know we care and they aren’t forgotten. This is the idea behind the Freedom Pens project. People from across the nation provide materials, time, talent and yes, money, to send what is a simple thing to us to our people in the field. While it is a pen and some people think, ”So what?”, it is much more. When you are out where they are and receive something hand made from home it tells them we are thinking about them, hoping they are safe and come home that way. Then add the fact that it comes from someone you never heard of, may never meet but thought enough of you and your job to make it for you just to say thanks.
So here is the organization that started it Freedom Pens if you would like more information and history. This is one of those ideas that you can help with if you never walked into a wood shop in your life. Almost every one of us has family or friends that serves or has served and they deserve our support. Pen kits used in making these aren’t terribly expensive but have to be paid for as do packing materials and shipping. If you can give a few dollars to help a group in your area, please, do. These people are doing all they can and many don’t have much money to give away. What they do have is everything else in their shops it takes to make the pens and small donations can provide enough kits for this project to keep moving forward.
If you can help with the cost of a trip to grab a hamburger this will provide several kits to a turner. Any amount helps any organization with their project but since, at least locally, I have seen no administration costs of any kind all money donated here pays for materials. I’m sure this is the case wherever this is being done since it is all about the troops not making a penny from it. If you can donate a couple of dollars to this project I hope you will it means a lot to someone you may never meet but deserves our thanks.
And with that I will leave you with a few pictures from David’s shop while stepping down from my soapbox.


Wednesday, April 13, 2011
Past and Future
I wasn’t planning to do another woodworking post but several folks liked this piece so I thought I would pass it along. Most of you know by now I am a firm believer in using what is at hand and this is a good example of going into the yard (well, at my house at least) and making something useful. The parts for this would be considered scrap or firewood by most people, in fact, the walnut was saved from a firewood stack while the Osage orange was laying in my yard. You could do this with hand tools but I have a few bigger toys that make it a bit faster.
As I talked with a couple of friends on Twitter about traditional archery, the subject of Osage orange being used for making a bow came up, this led to @ILCornfed asking if I could do a striker for a turkey call out of it. While I was working at the lathe turning some lures I had time to think about it and realized it could work. I had a small section of Osage that could be split and rescued walnut was sitting there all I had to do was turn the parts.
I took a chunk of Osage to work down first since if it failed there was no reason to do the top. Using a micrometer to check the thickness of one of my strikers I found out how small it needed to be. The one I used as a guide was 8 mm across and about 4-5” long. I chucked the first piece on the lathe and started cutting it down. I was surprised by how easy it worked. It didn’t take long to get it close to where it needed to be. I stopped to check it several times at this stage because it was pretty skinny. The simplest way for me to get it right was to use a parting tool at each end to turn down to the diameter I needed then cut the rest down with a bull gouge. When it was close I used a flat scraper to smooth the ridges out and then sanded it with 100 to 220 grit paper. After sanding I cut the ends off on the bandsaw then rounded one end with the disc sander and padded nail files.

For a first attempt at a top I used a piece of oak I found laying in our discard pile. Neighbor Don had tried to turn this oak but it wouldn’t turn, just made a mess. I tried to tell him to speed the lathe up but he thought slower would work. When I tried I used a faster speed and it cut like butter. After rounding it I measured a section 3 ½” long to taper using my store bought striker as a guide and Mark 1 eyeball to match it I got started. Since it was just a simple taper it only took a couple of minutes to turn and sand. Before I cut the ends off I used a small drill bit to put a pilot hole in the end where the osage would be added by simply drilling where the lathe spur had made a hole. This shows you the exact center of your work piece and makes it easier to enlarge the hole when you add the striker end. I matched the Osage piece to a drill bit then enlarged the hole to fit, cut the scrap ends off and sanded.

After getting the pieces ready I did a test fit to be sure I had things close. With the parts together I used one of my slate calls to see how it would sound. It was cool to hear it for the first time even though it was a bit too deep of a tone. I thinned the tip some by sanding to tune it to a higher pitch and that worked like a champ. This is when I thought about the walnut stacked outside.
I went out, found a likely looking piece and headed to the bandsaw for a bit of trimming. I crosscut a section about 5” long and got it on the lathe to commence with more turning. Since I had done one it didn’t take long to do the second one but I couldn’t leave it plain. I used a diamond parting tool to cut lines then used a bit of wire to burn the lines to darken them. I sanded this piece using 100 to 500 grit paper then drilled and trimmed it like the oak. I used a bit of wood glue to join all the parts and set them aside to dry. After they dried I applied a natural color stain to everything except the last 3/8” at the striker tip. I left this unstained so it wouldn’t affect the sound and could be sanded when needed.

 The tip is not lined up in the pic since it wasn't glued in yet.
While I have quite a bit of store bought equipment around I am trying to produce things that I can be proud to say are one of a kind and work. I want to be able to provide the people that order from me items they can show off to friends and say that they have the only one exactly that shape or color. I never use templates when I turn, only rough plans when I build and no formulas when I paint. I couldn’t do two things exactly the same even if I wanted to. As I get older the things that our grandparents or great grandparents had and did are starting to mean more to me as I watch people drool over another mass produced item that anyone can buy. Are they good? For the most part, yes. Are they just alike? Yep. I remember a time when folks were more individual and what they used showed that side of them in its' quality and artistry which is what I want to provide.
I hope you give building something of your own a try. When we are all gone these are things hopefully that get passed along with stories of how Granma or Granpa made this, taught me how to use it and make my own so it all starts again.
If you would like to order an item or if you have a question you can contact me at ghost1066@gmail.com
As I talked with a couple of friends on Twitter about traditional archery, the subject of Osage orange being used for making a bow came up, this led to @ILCornfed asking if I could do a striker for a turkey call out of it. While I was working at the lathe turning some lures I had time to think about it and realized it could work. I had a small section of Osage that could be split and rescued walnut was sitting there all I had to do was turn the parts.
I took a chunk of Osage to work down first since if it failed there was no reason to do the top. Using a micrometer to check the thickness of one of my strikers I found out how small it needed to be. The one I used as a guide was 8 mm across and about 4-5” long. I chucked the first piece on the lathe and started cutting it down. I was surprised by how easy it worked. It didn’t take long to get it close to where it needed to be. I stopped to check it several times at this stage because it was pretty skinny. The simplest way for me to get it right was to use a parting tool at each end to turn down to the diameter I needed then cut the rest down with a bull gouge. When it was close I used a flat scraper to smooth the ridges out and then sanded it with 100 to 220 grit paper. After sanding I cut the ends off on the bandsaw then rounded one end with the disc sander and padded nail files.

For a first attempt at a top I used a piece of oak I found laying in our discard pile. Neighbor Don had tried to turn this oak but it wouldn’t turn, just made a mess. I tried to tell him to speed the lathe up but he thought slower would work. When I tried I used a faster speed and it cut like butter. After rounding it I measured a section 3 ½” long to taper using my store bought striker as a guide and Mark 1 eyeball to match it I got started. Since it was just a simple taper it only took a couple of minutes to turn and sand. Before I cut the ends off I used a small drill bit to put a pilot hole in the end where the osage would be added by simply drilling where the lathe spur had made a hole. This shows you the exact center of your work piece and makes it easier to enlarge the hole when you add the striker end. I matched the Osage piece to a drill bit then enlarged the hole to fit, cut the scrap ends off and sanded.

After getting the pieces ready I did a test fit to be sure I had things close. With the parts together I used one of my slate calls to see how it would sound. It was cool to hear it for the first time even though it was a bit too deep of a tone. I thinned the tip some by sanding to tune it to a higher pitch and that worked like a champ. This is when I thought about the walnut stacked outside.
I went out, found a likely looking piece and headed to the bandsaw for a bit of trimming. I crosscut a section about 5” long and got it on the lathe to commence with more turning. Since I had done one it didn’t take long to do the second one but I couldn’t leave it plain. I used a diamond parting tool to cut lines then used a bit of wire to burn the lines to darken them. I sanded this piece using 100 to 500 grit paper then drilled and trimmed it like the oak. I used a bit of wood glue to join all the parts and set them aside to dry. After they dried I applied a natural color stain to everything except the last 3/8” at the striker tip. I left this unstained so it wouldn’t affect the sound and could be sanded when needed.


While I have quite a bit of store bought equipment around I am trying to produce things that I can be proud to say are one of a kind and work. I want to be able to provide the people that order from me items they can show off to friends and say that they have the only one exactly that shape or color. I never use templates when I turn, only rough plans when I build and no formulas when I paint. I couldn’t do two things exactly the same even if I wanted to. As I get older the things that our grandparents or great grandparents had and did are starting to mean more to me as I watch people drool over another mass produced item that anyone can buy. Are they good? For the most part, yes. Are they just alike? Yep. I remember a time when folks were more individual and what they used showed that side of them in its' quality and artistry which is what I want to provide.
I hope you give building something of your own a try. When we are all gone these are things hopefully that get passed along with stories of how Granma or Granpa made this, taught me how to use it and make my own so it all starts again.
If you would like to order an item or if you have a question you can contact me at ghost1066@gmail.com
Monday, April 4, 2011
Oak and Walnut Transformed Pt 2
Well after a delay longer than I planned I finally got to finish up my rod rack. Don’t know what I was waiting on since it only took about an hour to have it ready to put back together. Anyway here are the final few steps in our rod rack as furniture project.
I started with the idea to use scrap wood to do a budget build but my buddy over at http://www.funcfish.com/ beat me to it and did a great job so there was no need for me to do it again. This build used the same idea, materials already in the shop, yes I have a lot of stuff available, to create something nice enough to bring inside not leave in the garage. With the help of my neighbor’s shop and wood supply I was able to do this project for zero cost. All materials were leftovers from previous projects, wood rescued from various places or bulk buys from auctions at very low cost long since recouped.
Getting back into the shop I had to decide where to drill holes for rods to sit. I measured the top board from the end to find the exact middle then working toward each end, put a mark every 5 inches ending up with 7. There is no reason for putting them at this spacing other than it looked good. This spacing will allow me to add a series of holes on the other side if I want to add more rods. If I do I will offset the holes to provide more room for the reels on the lower shelf. I measured in from the edge 1 ½ inches and using a center punch made a small hole to guide a 1” forstner’s bit to drill each hole using a drill press. Be sure and drill from the top and put a board under your work piece to minimize tear out. By drilling from the top any tears will be hidden underneath. Next I cut a half inch slot for each hole using a square to guide my Japanese handsaw, you could use a jig saw or another type of handsaw but I have this one and it is great for cuts like this. This finished the top shelf except for a final sanding.

 Drill press with Forstner's bit and backer board. Oh and a cluttered workbench.
The trim added to the top of each side piece needed shaping on each corner plus the walnut was too wide and had to be sanded to blend with the oak. I shaped the corners on my bench top belt/disc sander, I had considered a bunch of ways to layout the curve but in the end just eyeballed it. To cut down the extra width I used a palm sander with 60 grit paper to get it close then switched to100 grit. I used 220 grit paper for a final sanding and to round over any edges on all of the pieces. Everything was wiped down with a tack cloth to remove dust to get ready for stain.
 Belt/disc sander and my Japanese saw. I love this saw it was sent from Tokyo by a friend.

To keep the contrast high between the two colors of wood I decided to use walnut stain on the trim pieces but just a natural stain on the oak. To do this I used a small cloth folded into a point to carefully apply stain to all trim pieces first. Take your time so you don’t get dark stain on the lighter oak. If you do lightly sand it using a small piece of 400 grit after the walnut stain dries so you don’t contaminate the trim pieces with dust. After the walnut is done I used a cloth to apply the natural stain to the oak. I like to use old t-shirts since they tend to be lint free and soft to keep the streaks down. This goes fast since I use a product that is stain and polyurethane in the same can.
 End details with walnut pegs in mortises.
The last step is to cut some small pieces of cedar to hold the rods in place, just in case. You could use more walnut which would look good but I was lazy and used a piece of cedar already milled to the size I needed I found laying on a work bench. I had several ideas on how to keep the rods in place but this one was the fastest so it won out. Each cedar piece was finished with the natural stain and there we have it, finally finished. I realized as I loaded the pictures I left these out but you get the idea.
 And finally the finished piece.
This is an old form of joinery which I have been fascinated with for years. The idea that simple friction will hold a piece of furniture together is just cool stuff. Yes it does take a bit of fitting but in the end you have no nails or screws to hide plus it can be taken apart if you have to move or ship it.
This rod rack can be built with nothing but a few hand tools and a bit of space to lay things out. I’m lucky to have access to tools, two shops and a large quantity of lumber but I have done things like this with much less. One bit of advice on lumber, if you look you might find a sawmill close that you never paid attention to. We make regular visits to several in our area and buy wood at a tiny fraction of what it would cost at a lumber yard or box store. It takes more work to get it ready to use but the savings are huge. Don and I just made three tables from wood saved from a burn pile at Trott’s Mill where a truck load cost us $10.00. Except for the attachments for the legs the cost was pennies for each one. These will sell in the $100.00 range for a total cost to us of under $5.00 each.
Hope you enjoyed a bit more woodworking, thanks for taking some time to check it out.
I started with the idea to use scrap wood to do a budget build but my buddy over at http://www.funcfish.com/ beat me to it and did a great job so there was no need for me to do it again. This build used the same idea, materials already in the shop, yes I have a lot of stuff available, to create something nice enough to bring inside not leave in the garage. With the help of my neighbor’s shop and wood supply I was able to do this project for zero cost. All materials were leftovers from previous projects, wood rescued from various places or bulk buys from auctions at very low cost long since recouped.
Getting back into the shop I had to decide where to drill holes for rods to sit. I measured the top board from the end to find the exact middle then working toward each end, put a mark every 5 inches ending up with 7. There is no reason for putting them at this spacing other than it looked good. This spacing will allow me to add a series of holes on the other side if I want to add more rods. If I do I will offset the holes to provide more room for the reels on the lower shelf. I measured in from the edge 1 ½ inches and using a center punch made a small hole to guide a 1” forstner’s bit to drill each hole using a drill press. Be sure and drill from the top and put a board under your work piece to minimize tear out. By drilling from the top any tears will be hidden underneath. Next I cut a half inch slot for each hole using a square to guide my Japanese handsaw, you could use a jig saw or another type of handsaw but I have this one and it is great for cuts like this. This finished the top shelf except for a final sanding.


The trim added to the top of each side piece needed shaping on each corner plus the walnut was too wide and had to be sanded to blend with the oak. I shaped the corners on my bench top belt/disc sander, I had considered a bunch of ways to layout the curve but in the end just eyeballed it. To cut down the extra width I used a palm sander with 60 grit paper to get it close then switched to100 grit. I used 220 grit paper for a final sanding and to round over any edges on all of the pieces. Everything was wiped down with a tack cloth to remove dust to get ready for stain.


To keep the contrast high between the two colors of wood I decided to use walnut stain on the trim pieces but just a natural stain on the oak. To do this I used a small cloth folded into a point to carefully apply stain to all trim pieces first. Take your time so you don’t get dark stain on the lighter oak. If you do lightly sand it using a small piece of 400 grit after the walnut stain dries so you don’t contaminate the trim pieces with dust. After the walnut is done I used a cloth to apply the natural stain to the oak. I like to use old t-shirts since they tend to be lint free and soft to keep the streaks down. This goes fast since I use a product that is stain and polyurethane in the same can.

The last step is to cut some small pieces of cedar to hold the rods in place, just in case. You could use more walnut which would look good but I was lazy and used a piece of cedar already milled to the size I needed I found laying on a work bench. I had several ideas on how to keep the rods in place but this one was the fastest so it won out. Each cedar piece was finished with the natural stain and there we have it, finally finished. I realized as I loaded the pictures I left these out but you get the idea.

This is an old form of joinery which I have been fascinated with for years. The idea that simple friction will hold a piece of furniture together is just cool stuff. Yes it does take a bit of fitting but in the end you have no nails or screws to hide plus it can be taken apart if you have to move or ship it.
This rod rack can be built with nothing but a few hand tools and a bit of space to lay things out. I’m lucky to have access to tools, two shops and a large quantity of lumber but I have done things like this with much less. One bit of advice on lumber, if you look you might find a sawmill close that you never paid attention to. We make regular visits to several in our area and buy wood at a tiny fraction of what it would cost at a lumber yard or box store. It takes more work to get it ready to use but the savings are huge. Don and I just made three tables from wood saved from a burn pile at Trott’s Mill where a truck load cost us $10.00. Except for the attachments for the legs the cost was pennies for each one. These will sell in the $100.00 range for a total cost to us of under $5.00 each.
Hope you enjoyed a bit more woodworking, thanks for taking some time to check it out.
Tuesday, March 8, 2011
Collectible Lure and Bonus Give away
This is my first time to offer a collectible lure. In keeping with my Nostalgia theme I am making a total of 25 top water lures out of my limited supply of black walnut. Each will be made individually, no two will be exactly alike, then will be hand sanded and finished. After each one is stained it will have hand painted details added along with hardware then signed and numbered. After 25 are sold I will not offer this pattern again signed and numbered in walnut. Each lure will be 5-5 ½ inches in length, approximately 7/8 inch in diameter and come with a certificate.
You will have a choice of a hand made wooden presentation box or display stand. All of the wood used is native to Tennessee and I harvested each piece. The boxes and bases will be made from oak, walnut, tulip poplar or cedar depending on availability.
If you are a collector or want a present that can’t be found in any store here is your chance. They are $30.00 each with either the base or box included only add $2.00 s/h, if it is more I will pay it.
As a bonus and a thank you, when all lures are sold I will draw a name and that person will receive an original watercolor. For each purchase you get a number assigned to your name, these will be placed in a random number generator to fairly chose the winner.
If you would like to place an order contact me at
Thanks for taking a look.
 ghost1066@gmail.com or on Twitter @ghost1066.
You will have a choice of a hand made wooden presentation box or display stand. All of the wood used is native to Tennessee and I harvested each piece. The boxes and bases will be made from oak, walnut, tulip poplar or cedar depending on availability.
If you are a collector or want a present that can’t be found in any store here is your chance. They are $30.00 each with either the base or box included only add $2.00 s/h, if it is more I will pay it.
As a bonus and a thank you, when all lures are sold I will draw a name and that person will receive an original watercolor. For each purchase you get a number assigned to your name, these will be placed in a random number generator to fairly chose the winner.
If you would like to place an order contact me at
Thanks for taking a look.

Friday, February 4, 2011
Nostalgia in Cedar
I’m not a fly fisherman, I don’t tie flies, I do appreciate the artistry of the sport and the amazing art in the flies. I’m not a fly fisherman. I am an artist and sometimes woodworker, oh yeah and old. I remember when the original Big O came out. Hand carved, fat bellied crank bait that took bass fishermen by storm. We were just kids, along with my buddies, Brian and Keith, the twins, we drooled over magazines showing this new wonder bait. Not having a great deal of money but with time and inventive minds we set about making our own version of wooden crank baits.
Brian came up with a couple of slab sided designs that we caught quite a few fish on in our favorite pond in Shelby Park. This 5 acre pond in the middle of East Nashville was our training grounds, test facility and, just so happened, to hold some really big bass. We learned to cast bait casters there, tried all of the techniques we found in the books and caught many a big fish where people thought there was nothing but little bluegill. I caught my first 2 pound bass in the moat like channel that surrounds the lone island. When we carved a new bait this was the first place it hit the water.
Time went on, our income increased so the need to carve baits wasn’t an issue. We had tackle boxes full of everything we wanted so our carving days pretty much ended. Still over time I repaired, repainted and at times, carved wooden baits. What does this have to do with not being a fly fisherman? Well, they tie flies and several people I know have been showing off their flies. What happens when their beautiful work inspires you? I decided since I can’t tie flies, to revisit my youth, carve a quick top water bait and show folks how it’s done including a paint job.
Living where I do cedar is almost considered a weed. It is everywhere and either free or cheap. I make a type of cedar box so I always have plenty of aged stock on hand. The good part about baits, being small you can use scrap wood that normally goes to waste.I grabbed a cutoff laying in the shop and split it using a hammer and wood chisel. Then headed over to the band saw to get rid of the sap wood and start shaping.

 This bait is 5 inches long.
This bait is a simple cigar shape used for the walking the dog technique. Once it is roughed out on the saw I move to the belt/disc sander for final shaping. This could be done on a lathe but I want it to be less than perfect, showing it is hand made, plus I can have it done by the time I get a lathe set up. I just eyeball the shape, adjusting with the sander until it is very close to what I want. After the sander I use 3 different grits of sand paper to hand sand it into the final shape. Usually from 100 to 220 grit paper.

After sanding I used the drill press to drill a hole large enough to hold the weight I add to the rear of the bait to make it tail heavy. I used a bullet sinker that I put on the anvil and whacked with a hammer to slightly flatten it. I used a Dremel tool to shape the hole to get a good fit. You can do this with a sharp knife or Exacto, too. After the weight was below the level of the wood I used CA glue to hold it in place. I used 2 part epoxy to overfill the hole slightly. Push this into any voids around the sinker and make sure it is just higher than the wood. It takes a little more sanding but works as a filler and sealer. After it dries, sand it down to match the contours of the cedar. For this I use fingernail files I get from a beauty supply store. Now to seal and paint.

At this point add your attachment points for line and hooks, remember you need something to hang onto while painting and to hang them by while they dry, so add one at least. I use an inexpensive primer most of the time but a good wood sealer isn’t a bad idea. Once the sealer is dry prime the bait using flat white. This keeps your colors from becoming muted as it does with grey or black. If you want your scales to be edged in black then you have to lay black down first.
Painting is as simple or as complex as your imagination, ability and equipment will allow. I painted many a productive bait with a brush or can of spray paint. This one is going to be painted with three techniques. I will use spray cans for the first two colors, airbrush the next few colors and then add eyes and gills with a brush. Then I seal everything with a polyurethane spar varnish, again from a spray can. This stuff gives a good high gloss, helps protect from exposure to sun and water and is a snap to apply.
After deciding I wanted this one to be in a golden shiner pattern I laid out what I needed. I used an almond base simply because it was what I had on hand. After this dried I painted the entire bait silver, again with a spray can. I allowed this to dry for a couple of hours before starting with the airbrush. I like to use transparent airbrush ready paint and there are several good brands out there. Some people use lacquers or taxidermy paints but I like using water based. I paint with a Paasche VL double action airbrush and a Badger airbrush compressor, this setup works great for whenever I need an airbrush.

I used a piece of tulle that I have mounted in a cardboard frame to add the scales. I leave some slack in the material to allow me to make it form to the bait by pushing it until tight. I used a transparent pink along each side leaving the bottom silver, this is the only step where the tulle is used.. After this dried I mixed transparent yellow and Indian red to get a light yellowish/bronze color. This is blended into the top of the scales and then painted solid across the top of the bait. I added more of the Indian red to darken the color and painted the top of the bait. I let this dry and decided to add a bit more of the red to darken it again and painted this along the center of the back.


After painting the main colors all that is left is detail. I went with hand painting these to keep with the hand made theme. You can buy eyes in many different styles which work great if you are one of those folks that has to have everything perfect. I painted black circles for the eyes and kill spots with a simple crescent shape for the gills. I painted the center of the eye with yellow leaving a bit of black showing around the edge then added a fat crescent shape for the pupil. All that is left is coating everything repeatedly with the spar polyurethane. I let this dry until it is just a little tacky and add another layer. Most baits get around 5-6 coats.
 Will there it is. Hand carved cedar top water baits. I make several versions of this in whatever sizes someone wants. Since they are all custom painted I can have tons of colors and patterns. Just think them up and get them painted.

Disclaimer: I was not compensated by any of the brands mentioned in this article.
Brian came up with a couple of slab sided designs that we caught quite a few fish on in our favorite pond in Shelby Park. This 5 acre pond in the middle of East Nashville was our training grounds, test facility and, just so happened, to hold some really big bass. We learned to cast bait casters there, tried all of the techniques we found in the books and caught many a big fish where people thought there was nothing but little bluegill. I caught my first 2 pound bass in the moat like channel that surrounds the lone island. When we carved a new bait this was the first place it hit the water.
Time went on, our income increased so the need to carve baits wasn’t an issue. We had tackle boxes full of everything we wanted so our carving days pretty much ended. Still over time I repaired, repainted and at times, carved wooden baits. What does this have to do with not being a fly fisherman? Well, they tie flies and several people I know have been showing off their flies. What happens when their beautiful work inspires you? I decided since I can’t tie flies, to revisit my youth, carve a quick top water bait and show folks how it’s done including a paint job.
Living where I do cedar is almost considered a weed. It is everywhere and either free or cheap. I make a type of cedar box so I always have plenty of aged stock on hand. The good part about baits, being small you can use scrap wood that normally goes to waste.I grabbed a cutoff laying in the shop and split it using a hammer and wood chisel. Then headed over to the band saw to get rid of the sap wood and start shaping.


This bait is a simple cigar shape used for the walking the dog technique. Once it is roughed out on the saw I move to the belt/disc sander for final shaping. This could be done on a lathe but I want it to be less than perfect, showing it is hand made, plus I can have it done by the time I get a lathe set up. I just eyeball the shape, adjusting with the sander until it is very close to what I want. After the sander I use 3 different grits of sand paper to hand sand it into the final shape. Usually from 100 to 220 grit paper.

After sanding I used the drill press to drill a hole large enough to hold the weight I add to the rear of the bait to make it tail heavy. I used a bullet sinker that I put on the anvil and whacked with a hammer to slightly flatten it. I used a Dremel tool to shape the hole to get a good fit. You can do this with a sharp knife or Exacto, too. After the weight was below the level of the wood I used CA glue to hold it in place. I used 2 part epoxy to overfill the hole slightly. Push this into any voids around the sinker and make sure it is just higher than the wood. It takes a little more sanding but works as a filler and sealer. After it dries, sand it down to match the contours of the cedar. For this I use fingernail files I get from a beauty supply store. Now to seal and paint.

At this point add your attachment points for line and hooks, remember you need something to hang onto while painting and to hang them by while they dry, so add one at least. I use an inexpensive primer most of the time but a good wood sealer isn’t a bad idea. Once the sealer is dry prime the bait using flat white. This keeps your colors from becoming muted as it does with grey or black. If you want your scales to be edged in black then you have to lay black down first.
Painting is as simple or as complex as your imagination, ability and equipment will allow. I painted many a productive bait with a brush or can of spray paint. This one is going to be painted with three techniques. I will use spray cans for the first two colors, airbrush the next few colors and then add eyes and gills with a brush. Then I seal everything with a polyurethane spar varnish, again from a spray can. This stuff gives a good high gloss, helps protect from exposure to sun and water and is a snap to apply.
After deciding I wanted this one to be in a golden shiner pattern I laid out what I needed. I used an almond base simply because it was what I had on hand. After this dried I painted the entire bait silver, again with a spray can. I allowed this to dry for a couple of hours before starting with the airbrush. I like to use transparent airbrush ready paint and there are several good brands out there. Some people use lacquers or taxidermy paints but I like using water based. I paint with a Paasche VL double action airbrush and a Badger airbrush compressor, this setup works great for whenever I need an airbrush.

I used a piece of tulle that I have mounted in a cardboard frame to add the scales. I leave some slack in the material to allow me to make it form to the bait by pushing it until tight. I used a transparent pink along each side leaving the bottom silver, this is the only step where the tulle is used.. After this dried I mixed transparent yellow and Indian red to get a light yellowish/bronze color. This is blended into the top of the scales and then painted solid across the top of the bait. I added more of the Indian red to darken the color and painted the top of the bait. I let this dry and decided to add a bit more of the red to darken it again and painted this along the center of the back.


After painting the main colors all that is left is detail. I went with hand painting these to keep with the hand made theme. You can buy eyes in many different styles which work great if you are one of those folks that has to have everything perfect. I painted black circles for the eyes and kill spots with a simple crescent shape for the gills. I painted the center of the eye with yellow leaving a bit of black showing around the edge then added a fat crescent shape for the pupil. All that is left is coating everything repeatedly with the spar polyurethane. I let this dry until it is just a little tacky and add another layer. Most baits get around 5-6 coats.


Disclaimer: I was not compensated by any of the brands mentioned in this article.
Tuesday, February 1, 2011
Oak and Walnut Transformed
I got inspiration from my friend @funcfish on Twitter (look in the top right for a link to his site) and the fact that I had a pile of rods stacked in the corner. He did a budget rod rack that is very functional, so, I thought I would try to do one that is a bit fancier and more like furniture. The main reason is my rods are kept in my office/outdoors room and I wanted to see if I could make it nice enough to fit inside the house. This might not be a beginner’s project and while you can do it with hand tools, it is much easier with a room full of woodworking stuff.
Staying with his idea of using what was on hand, I headed to the wood shop after a little planning to see what was there. I picked out some antique oak that had been saved from an old barn. This stuff is hard as a rock and not a lot of fun to work with but there was enough of it and some boards needed to be used since they were cracking. There was some walnut laying there for a good contrast in color for the trim. You could use whatever you like to do this project, pine would be very easy to use. If you do use pine I would still use a hardwood for the pegs that hold things together. So, here we go.
 The choices, oak, poplar, cedar, walnut
Parts list
2 pieces - 5” x 42” x ¾”
2 pieces - 5” x 30” x ¾”
2 pieces - 2” x 10” x ¾”
2 pieces - ¾” x ¾”
4 pieces - 2 ½” x 1”x 1”
Wood glue
There are no nails or screws needed for this project.
After picking out the boards they were run through the planer to true the sides and get them down to ¾ inch thickness. These were then cut to length and ripped to width on the table saw to true the ends and edges. In woodworking terms this is S4S or surfaced on 4 sides.
 Don't try to take a pic while holding onto the board being planed.
 Don ripping boards to width.
This project uses mortise and tenon joinery for the four main pieces and dowels for adding the feet. I laid out the tenons on the long boards. From the end measure back 3” and mark across the board. Then measure in from each side 1” and cut these pieces out leaving a tenon 3”x3”. I used a band saw but a jig saw would work or a hand saw if you take your time. For the mortise measure in 1” from each side of the tenon, from the end of the tenon measure back 1 ¼” and make a mark then another at 2 3/8”. This should give you a rectangle one inch by one and an eighth. Check to be sure the mortise is 5/8” from the back of the tenon it needs to be inside the vertical board, you will see why later. Repeat this on the ends of both long boards. You should have two boards measuring 42” with a 3” tenon on each end leaving a section in the middle measuring 36” from tenon to tenon.
 Tenon cut on band saw. Note the mortise laid out on board.
 The crappy mortiser.
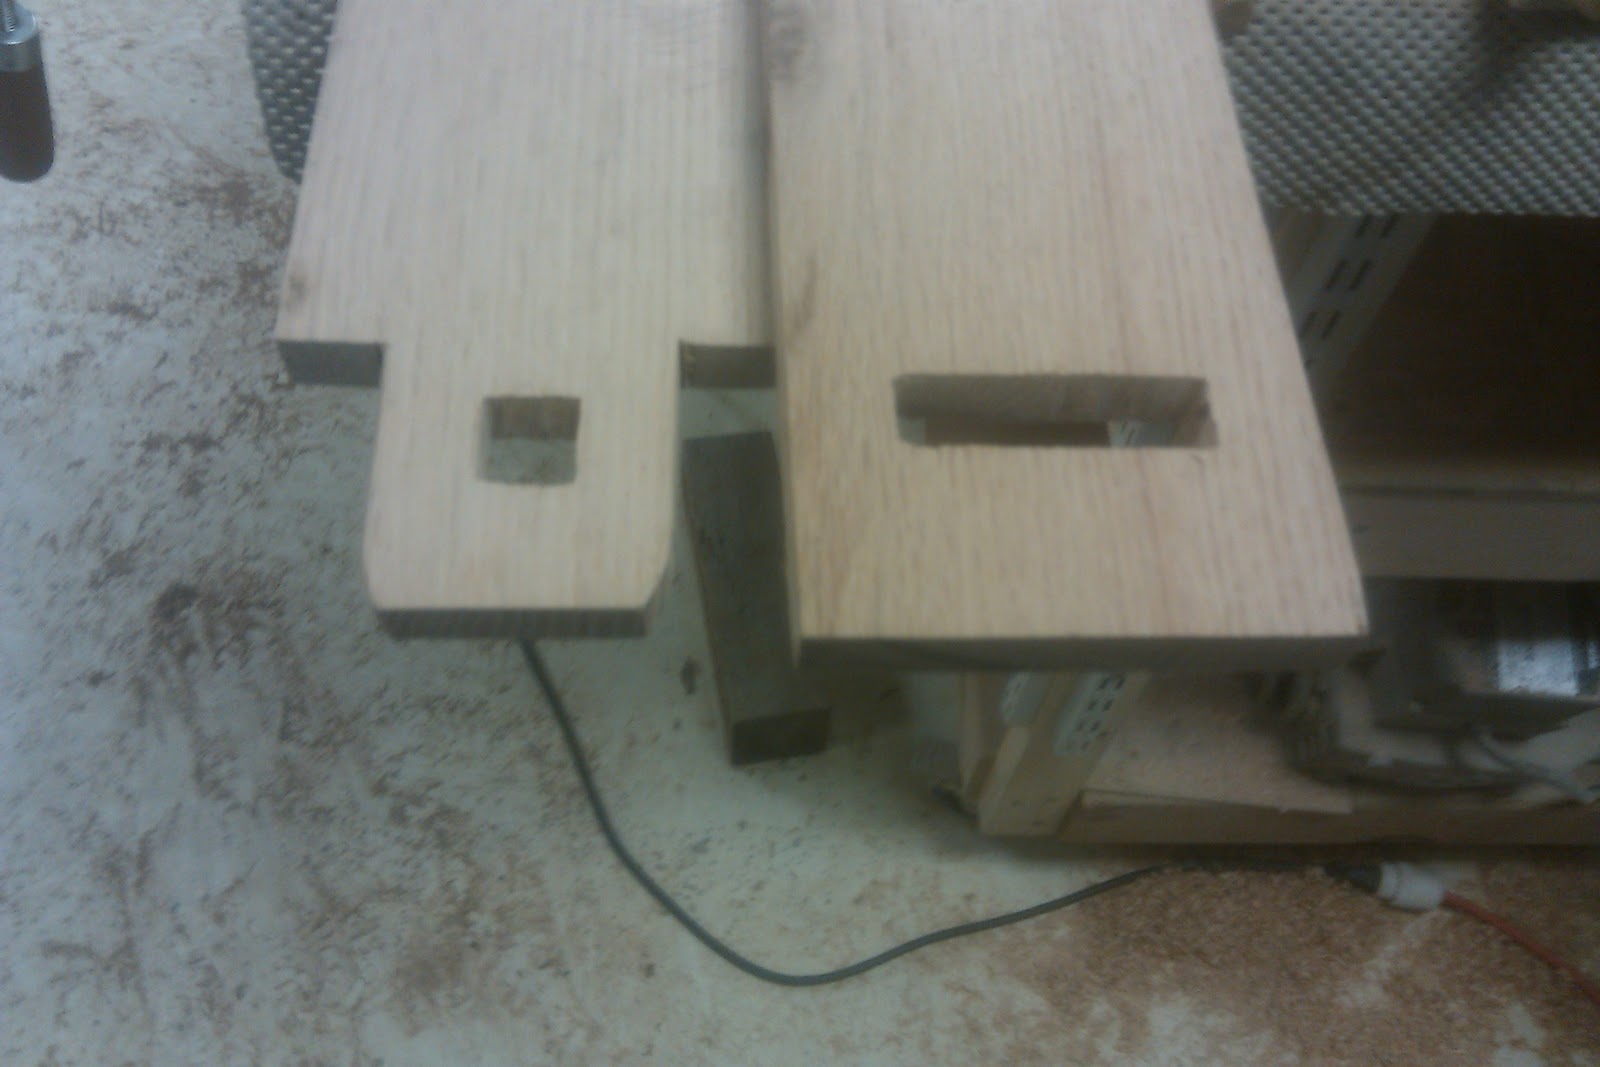
 This is what you end up with before trueing with files.
For the shorter end boards you need a mortise near each end for the long boards to fit into. On one end measure in down 1”and mark across the board then measure down another ¾” and make another mark. Measure in from each side 1”. This should give you a rectangle ¾”x 3”. On the other end measure down 2” and then repeat the rest of the step above. Once all of the mortises are laid out I used a dedicated mortiser to remove the material. You could do the same thing by drilling holes near the corners then use a jig saw (I wish I had) which would have worked better than the junky mortiser I used.
Once all of the mortise and tenons are cut I needed to true them and fit each part together. This is done with a set of woodworker’s files and rasps. Decide which side is up on the long boards and always test your fit with the same tenon going into the same mortise. I numbered mine and marked the top to be sure I didn’t mix them up. On the short boards the mortise that is 1” from the end is the bottom and will have the foot attached later.
 Cleaning up the mortise with a file.
 Top shelf being test fitted.
After fitting the pieces I picked the walnut I was using for trim. Instead of drilling shallow holes into the bottom to accept the rod handles I decided to add a raised piece of trim measuring ¾” x ¾” along the front and back edge of the bottom shelf. These were cut long, glued then clamped in place to dry. Be sure the edges line up as best as you can to cut down on sanding later. But if they are off a bit sanding blends them so don’t worry too much, just get them as close as you can. After they dry I cut the trim to length using a Japanese trim saw. While these are drying you can work on the sides, feet and trim for the top.
 Prepping the walnut.
 Clamped and waiting for glue to dry on walnut trim.
I made the pattern for the feet using a scrap piece of wood but you could use cardboard. I drew the pattern on the scrap, cut it close on the band saw then finished it on the oscillating drum sander. This was used to transfer the shape to the ends of the feet. Use double sided tape to hold the feet together then cut the excess away on the band saw. Using the oscillating sander I sanded down to the line making the feet match. These are attached to the end boards using wooden dowels. Find the center of the side piece and the center of the foot. Measure out from the center 1 ¾” toward the edge and drill a hole in the center of the board one size larger than the dowel. I used the bit to enlarge and taper the hole to give me some wiggle room in making them fit. Cut the dowels to length, add glue and attach the foot to the side. I used bar clamps to draw everything together. Again try to get things as even as you can to cut down on sanding.


I wanted a piece of walnut trim on the top of the ends to give them a finished look. I cut two pieces of walnut 5 ¼” long x ¾” square. I glued these to the tops, clamping them with bar clamps till dry. After they were dried I drew a radius on the top corners and I will sand to the line, giving them a nice curve instead of sharp corners.
To hold everything together you need 4 wedges, which I made out of a scrap of walnut. I cut them into 1” squares 2 ½” long then shaped them on the belt/disc sander. You need to add a taper to one side so that as it tightens it will push everything together. Take your time and test fit these frequently to be sure you get a good fit and don’t take off too much material. This piece really needs to be made from hardwood even if you chose to work with pine for the rest of the boards.
 Cutting the wedges on the band saw.
 Testing the wedges. Look close on top of wedge you will see it is numbered.
I was planning to finish this in one post but things got in the way. Here is a shot of the almost finished piece. I still need to drill holes for the rods, cut slots back to the holes, make walnut pegs to hold rods in place, finish sanding and add finish. This sounds like a lot but it really isn’t but other things have kept me from getting it done. I will get it finished up in a few days and post the last few steps and pictures of the finished piece.

Staying with his idea of using what was on hand, I headed to the wood shop after a little planning to see what was there. I picked out some antique oak that had been saved from an old barn. This stuff is hard as a rock and not a lot of fun to work with but there was enough of it and some boards needed to be used since they were cracking. There was some walnut laying there for a good contrast in color for the trim. You could use whatever you like to do this project, pine would be very easy to use. If you do use pine I would still use a hardwood for the pegs that hold things together. So, here we go.

Parts list
2 pieces - 5” x 42” x ¾”
2 pieces - 5” x 30” x ¾”
2 pieces - 2” x 10” x ¾”
2 pieces - ¾” x ¾”
4 pieces - 2 ½” x 1”x 1”
Wood glue
There are no nails or screws needed for this project.
After picking out the boards they were run through the planer to true the sides and get them down to ¾ inch thickness. These were then cut to length and ripped to width on the table saw to true the ends and edges. In woodworking terms this is S4S or surfaced on 4 sides.


This project uses mortise and tenon joinery for the four main pieces and dowels for adding the feet. I laid out the tenons on the long boards. From the end measure back 3” and mark across the board. Then measure in from each side 1” and cut these pieces out leaving a tenon 3”x3”. I used a band saw but a jig saw would work or a hand saw if you take your time. For the mortise measure in 1” from each side of the tenon, from the end of the tenon measure back 1 ¼” and make a mark then another at 2 3/8”. This should give you a rectangle one inch by one and an eighth. Check to be sure the mortise is 5/8” from the back of the tenon it needs to be inside the vertical board, you will see why later. Repeat this on the ends of both long boards. You should have two boards measuring 42” with a 3” tenon on each end leaving a section in the middle measuring 36” from tenon to tenon.


For the shorter end boards you need a mortise near each end for the long boards to fit into. On one end measure in down 1”and mark across the board then measure down another ¾” and make another mark. Measure in from each side 1”. This should give you a rectangle ¾”x 3”. On the other end measure down 2” and then repeat the rest of the step above. Once all of the mortises are laid out I used a dedicated mortiser to remove the material. You could do the same thing by drilling holes near the corners then use a jig saw (I wish I had) which would have worked better than the junky mortiser I used.
Once all of the mortise and tenons are cut I needed to true them and fit each part together. This is done with a set of woodworker’s files and rasps. Decide which side is up on the long boards and always test your fit with the same tenon going into the same mortise. I numbered mine and marked the top to be sure I didn’t mix them up. On the short boards the mortise that is 1” from the end is the bottom and will have the foot attached later.


After fitting the pieces I picked the walnut I was using for trim. Instead of drilling shallow holes into the bottom to accept the rod handles I decided to add a raised piece of trim measuring ¾” x ¾” along the front and back edge of the bottom shelf. These were cut long, glued then clamped in place to dry. Be sure the edges line up as best as you can to cut down on sanding later. But if they are off a bit sanding blends them so don’t worry too much, just get them as close as you can. After they dry I cut the trim to length using a Japanese trim saw. While these are drying you can work on the sides, feet and trim for the top.


I made the pattern for the feet using a scrap piece of wood but you could use cardboard. I drew the pattern on the scrap, cut it close on the band saw then finished it on the oscillating drum sander. This was used to transfer the shape to the ends of the feet. Use double sided tape to hold the feet together then cut the excess away on the band saw. Using the oscillating sander I sanded down to the line making the feet match. These are attached to the end boards using wooden dowels. Find the center of the side piece and the center of the foot. Measure out from the center 1 ¾” toward the edge and drill a hole in the center of the board one size larger than the dowel. I used the bit to enlarge and taper the hole to give me some wiggle room in making them fit. Cut the dowels to length, add glue and attach the foot to the side. I used bar clamps to draw everything together. Again try to get things as even as you can to cut down on sanding.


I wanted a piece of walnut trim on the top of the ends to give them a finished look. I cut two pieces of walnut 5 ¼” long x ¾” square. I glued these to the tops, clamping them with bar clamps till dry. After they were dried I drew a radius on the top corners and I will sand to the line, giving them a nice curve instead of sharp corners.
To hold everything together you need 4 wedges, which I made out of a scrap of walnut. I cut them into 1” squares 2 ½” long then shaped them on the belt/disc sander. You need to add a taper to one side so that as it tightens it will push everything together. Take your time and test fit these frequently to be sure you get a good fit and don’t take off too much material. This piece really needs to be made from hardwood even if you chose to work with pine for the rest of the boards.


I was planning to finish this in one post but things got in the way. Here is a shot of the almost finished piece. I still need to drill holes for the rods, cut slots back to the holes, make walnut pegs to hold rods in place, finish sanding and add finish. This sounds like a lot but it really isn’t but other things have kept me from getting it done. I will get it finished up in a few days and post the last few steps and pictures of the finished piece.

Subscribe to:
Comments (Atom)

About Me

- Tommy Ellis
- Born and raised in middle Tennessee.I'm a working wildlife and landscape artist specializing in watercolors. Now making cedar lures and custom turkey calls.

