
Sunday, February 20, 2011
Painting Session
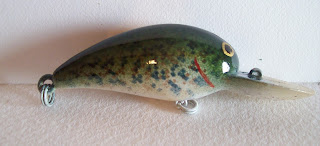
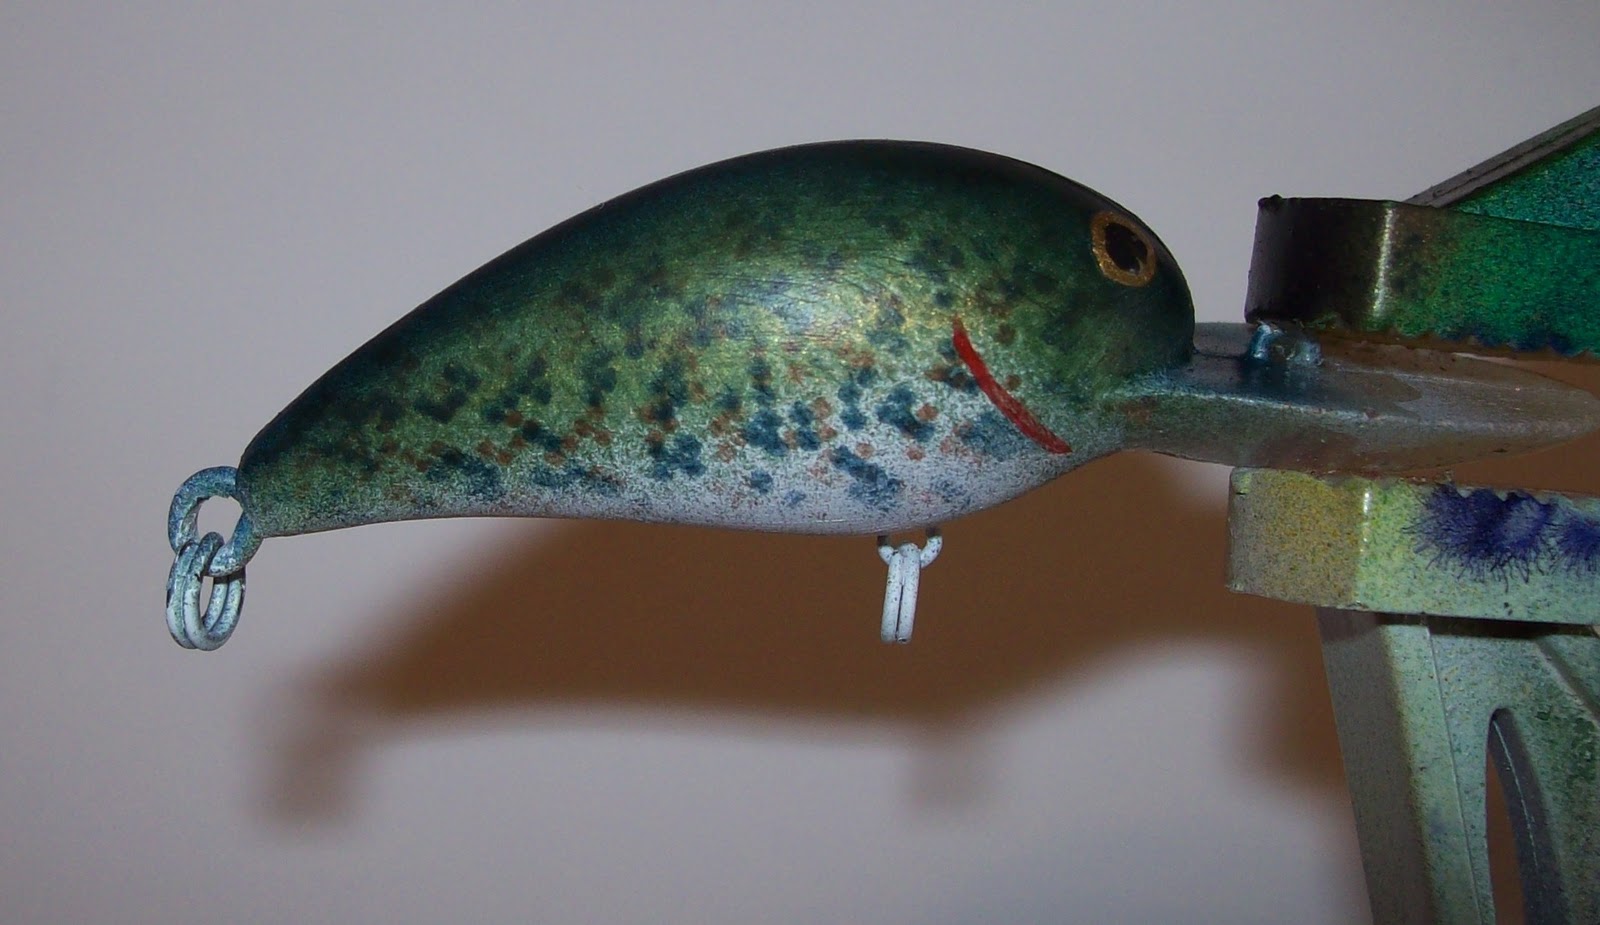
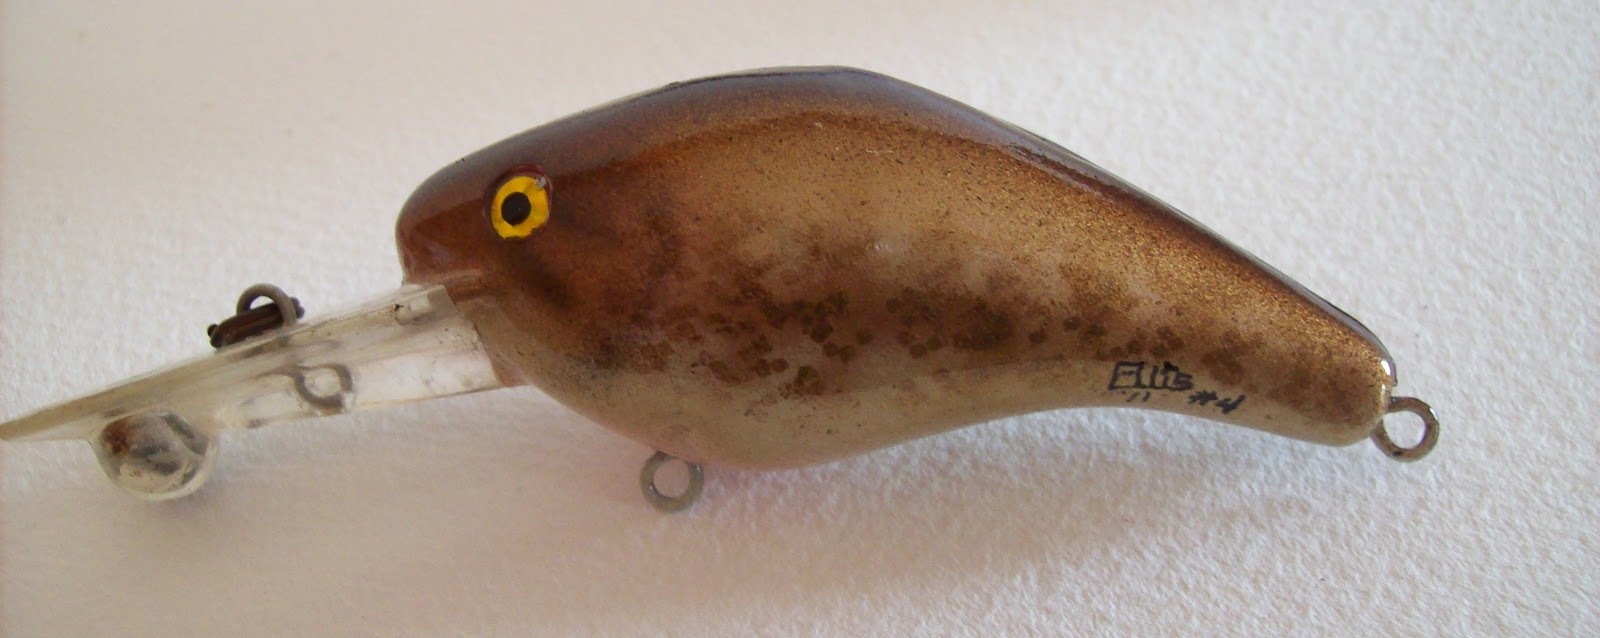
Here are a few pics of baits I recently repainted. These are just a few of the patterns folks can order either on my cedar baits or on lures they supply. At times I have complete baits like these available but the list is always changing. If you see one you like or want to ask about availablity my contact information at the bottom of this post.
 Crappie Pattern before clear coat.
 After clear coat.
 Smooth Goldfish. Smooth patterns have no scale pattern.
 Baby Smallmouth bass.
These are tough to photograph since the clear coat reflects so much. I think they look better than the pics show but thought you might like to take a look.
If you are interested in some custom paint or some of my cedar baits you can contact me at ghost1066@gmail.com


These are tough to photograph since the clear coat reflects so much. I think they look better than the pics show but thought you might like to take a look.
If you are interested in some custom paint or some of my cedar baits you can contact me at ghost1066@gmail.com
Thursday, February 17, 2011
Walk in the Park
6:00 Friday morning and I had worked a night shift. Me and my future ex wife had plans to go somewhere, can’t say I remember where, Florida maybe, but I had time to kill till she was able to leave. I went home to find out what time we were meeting and found out it wasn’t for several hours. Now the smart thing after a 12 hour shift would be get some sleep but it is summer, warm, raining and Shelby Park is on the way to where we will meet. The park, you see, is where in it’s 5 acre pond chock full of good fish, I learned most of my bass fishing.
Thinking it over for all of 3 seconds I grabbed a spinning rod, some #9 floating Rapalas and took off. The pond has a couple of good banks bass cruise whenever it is warm and raining and I love to throw Rapalas on cloudy, rainy days especially in ponds. I pulled into the parking spot at what we call the spillway bank, possibly because it has a spillway on it, which is my favorite spot to start. This bank has a couple of ledges stair stepping down to about 4 feet of water and fish stack up on it to feed either early, late or during dreary days.
It was rush hour, people on their way to work cutting through the park using the road on the spillway bank staring at me as I rig up. They had to wonder why anyone would waste time in this pond on a good day much less with rain coming down. Typical, most folks don’t know what I know, to them this is a place to take the kids on a Sunday afternoon and feed the ducks. It is an almost completely overlooked bass fishery right under their noses, at one time even held the world record for carp.
I eased down to the water’s edge and started making casts paralleling the bank starting just about a foot out. Many people fish this spot but they will throw out towards the middle not realizing fish are right by their feet. Bass hold just at the drops and rush into a couple of inches of water to grab food swimming along the bank. I work my bait slowly twitching and pausing giving the fish time to take it. I make a series of casts from each spot working the bait from a foot to maybe six feet from the bank then move up to where my bait was landing to start again. After just a few casts a solid 2 ½ pounder took the Rapala in a boiling strike. A fun, quick fight and I was able to release him back in good shape. I made my next cast and had another fish on almost as soon as it hit the water, a twin to my first one. This turned out to be the program for the morning.
As I fished along I was getting strike after strike. The fish were hitting just the way a top water fan hopes for. Some came up in a big boil, swirling under the bait to suck it down. Others came up to blast it out of the pond, twisting in the air, throwing spray back at the rain. Normally I move along the bank faster than I was but I slowed down to make sure I didn’t miss fish. I have fished this pond for many years and knew this was one of those mornings that rarely come along. Fish from 1 to 4 pounds were hitting everywhere.
The spillway bank is about 100 yards long, is the best bank on the pond and today was covered in fish. The spillway is just over halfway down and by the time I got there I caught 8 or 9 fish plus had more hits. The rain was still coming down steadily, just enough to keep the fish up but not enough to run me off. As I walked past the spillway a car pulled over, a friend on his way to work gets out, comes over and asks what I’m doing. Just as he walked up another 2 pounder latches on as if to answer for me. When I landed it he says he wouldn’t mind catching one like that. I handed him the rod, pointed to a spot at the corner of the spillway, telling him to cast just past it and twitch the bait back past it. He’s a good fisherman and does just what I had told him. As the bait gets even with the concrete corner a fat 3 pounder rolls out and smacks it. He has a huge smile on his face as the bass tail walks, shaking it’s head trying to throw the bait. I land it for him, he is saying he can’t believe that just happened so I tell him what the fish are doing. Now all he wants to do is skip work, go grab some tackle and come back. He says that isn’t going to happen, thanks me for letting him catch one and heads off.
I worked my way back along the bank to my truck, catching a couple of more good fish and missing a few. It was hard to believe fish were this aggressive in these numbers. Beyond where I parked there is a pipe bring fresh water into the pond. This was meant to go farther out but had broken about 20 feet from the bank creating a small area with current. I made a cast into the fast water, letting it pull the Rapala out several feet then closed the bail to start my retrieve. That was as far as I got. A 4 pounder nailed it and took off, my light rod bent double, drag buzzing in protest. I got her to the bank and released, checked my line and knot then put another cast in the same spot with exactly the same results. I stood in this one spot and hooked 6 fish, none smaller than the first, managing to land 4 of them with one leaving with my bait as the line snapped when it brushed against the end of the pipe.
I tied on another bait, tried a few more casts into the fast water without a hit. Moving to my right I cast to a couple of old stumps rotting away a couple of feet under the surface. I cast past them, started the crippled minnow retrieve and it was blasted out of the water. This had turned into one of my best mornings ever. After casting back to the stumps without a strike I got into my truck and drove to the small bridge going out to the island. I wanted to fish this before I ran out of time.
Most of the island isn’t worth fishing but near the end closest to the main part of the pond there are big rocks hidden underwater. I got fish after fish along the whole point. Finally running out of time I made my last cast and headed to the truck. I had a final total of 32 fish hit and landed 24. Most were over 2 pounds with the biggest a football shaped 4 pounder. All were caught on a #9 floating Rapala fished on top. This was years ago but man what a morning.
There are so many overlooked or under estimated ponds. Some, like Shelby Park, right in the middle of cities. I try to find these small waters for those days when a single rod and walking the bank is all I want.
Monday, February 7, 2011
April on the Stones

I stepped into the north side of the river where it narrows creating faster water only a few inches deep. Crossing in a couple of steps to the gravel island covered in water grass, low growing willow trees and button ball bushes, then turn left to the first pool. The river cuts around both ends of the island coming back together in the middle of the riverbed. Here it splits again into 3 deeper, faster runs combining 50 yards downstream into a wider pool. After that it’s rapids with small waterfalls dropping into the next pool. Repeat this for about a ¼ of a mile. Trees and bushes line the banks with rocks covering the bottom dotted here and there with islands of gravel, willows and button ball bushes. The first pool never yields fish, nor do the 3 runs but below it, in that next pool things change. It’s early spring, sun warming air and water, buds turn to tiny leaves, fish start to move, once again it is time for redeye.

The Stones River starts as a bit of nothing. A series of creeks you can step across. As they join force and begin to grow the East and West Forks of the Stones take shape. These two come together near Smyrna just south of Nashville. In the late 60s the Stones was dammed to form J. Percy Priest lake. Heavily fished and a huge recreational draw, Priest is what I consider my home lake. But this is about places that lie upstream. Above the old hand built Nice Mill dam 23 miles upstream of the main dam there are places no boat is needed, few people fish and we can travel back to times when a few small fish were all we expected.
In April when waters begin to warm and March high waters have dropped I start to check the river watching for the first water plants to green up along shallow rocks and shoals. This little bit of sign is what I need to know spring wading season is beginning. Not the high tech of fly fishermen just waders to stay warm, a small pack with a few baits and my trusty 5 foot ultra light spinning rod. Many people think this is a quest for river smallmouth or spotted bass, called Kentuckys in this area. You catch these and an occasional largemouth some weighing several pounds but I am after redeye. A member of the sunfish family, they move into chunk rocks and ledges in early spring to spawn. Good to eat, a blast to catch, they fight hard on light tackle and are usually very aggressive.
Over ten years ago during a bout of boredom I decided to grab a rod and head over to the river. I lived five minutes away and traveled past this piece of water at least twice daily but like most people had never taken the time to fish it. The cool thing, it is right in the middle of a fairly large town and almost no one fishes it. It has a greenway running miles of it’s length and is still under fished. The few people that take time to try it are mostly clueless as to what it holds and how to fish for them, this suits me fine.
Redeye during most of the year are spread out and nocturnal. We catch a few night fishing for bass. During several weeks in spring they bunch up in rocky areas along select sections and this is when I hit the water. Tackle is simple, a small spinning reel loaded with 6 lb line, a 5 ft ultra light rod and a few spinners. The fish are suckers for blue and white spinners and a small Rocket Shad works best. They hit this until nothing is left, tearing the skirt to shreds, knocking hooks off, even the blades. Other baits work but nothing like this. You can catch them drifting small crawfish but they are so aggressive the spinner is more fun and less work. So, armed with a few baits and a tiny spinning rod you can be headed for great fun. We have fished jigs and small crank baits which produce but maybe only 1 to every 10-15 the spinners do.

I have found a few slab rocks, holes and slots that always hold the biggest fish. These spots need to be fished correctly even to within inches to get a strike but years of practice have paid off. Most fish prefer banks with current and stay away from mid stream structure or the slower side of the river. I wade down stream using a quartering cast cross current, casting as close to the bank as possible, even onto the bank at times, and begin a steady retrieve. When the spinner gets to a drop off I will let it fall, slowing the retrieve for a couple of feet then speeding it back up. This simple technique causing savage strikes especially from larger fish. For shallow areas with deep cuts going down into the rocks I speed the bait up to create a wake so I have the fun of top water strikes. The strikes are hard, never a subtle pick up and like all of their family they fight.
The fast water just below falls or rapids form eddies behind rocks and the ends of gravel bars along the banks which hold fish but be sure to try the downstream side of larger rocks in the fast current. Deep cuts with ledges or deep small pools on the fast side of the river will consistently hold fish. If you catch fish in a spot within a day or two more have moved in to replace them.
As weeks go by larger fish move in and a full stringer is common. This goes on for about four weeks, when largemouth start to hit you know the redeye are winding down. This all happens here just as leaves are showing. As an added bonus other residents of the river are starting to hit, shell crackers, bream (brim), crappie, bluegill and bass are starting to become more active.

Just getting out this time of year when weather can be iffy at best is a treat. Simple tackle and techniques along with a river free of anyone except an occasional wood duck or heron, what a fine way to spend a bit of time. I have no doubt that somewhere near you is an overlooked piece of water that is calling your name. Do a bit of scouting, scale back your equipment and go enjoy creeks and small rivers like we did as kids.
Sadly, two years ago the exact spot I fish was hit with an EF-3 tornado. It ripped up islands, destroyed all the covering trees and shrubs changing the river drastically. Last year we were hit with a 500 year flood, spring will tell how much the river has changed and if my spots still hold fish. I will be there searching and hoping my little stretch of the Stones has started to recover.
Friday, February 4, 2011
Nostalgia in Cedar
I’m not a fly fisherman, I don’t tie flies, I do appreciate the artistry of the sport and the amazing art in the flies. I’m not a fly fisherman. I am an artist and sometimes woodworker, oh yeah and old. I remember when the original Big O came out. Hand carved, fat bellied crank bait that took bass fishermen by storm. We were just kids, along with my buddies, Brian and Keith, the twins, we drooled over magazines showing this new wonder bait. Not having a great deal of money but with time and inventive minds we set about making our own version of wooden crank baits.
Brian came up with a couple of slab sided designs that we caught quite a few fish on in our favorite pond in Shelby Park. This 5 acre pond in the middle of East Nashville was our training grounds, test facility and, just so happened, to hold some really big bass. We learned to cast bait casters there, tried all of the techniques we found in the books and caught many a big fish where people thought there was nothing but little bluegill. I caught my first 2 pound bass in the moat like channel that surrounds the lone island. When we carved a new bait this was the first place it hit the water.
Time went on, our income increased so the need to carve baits wasn’t an issue. We had tackle boxes full of everything we wanted so our carving days pretty much ended. Still over time I repaired, repainted and at times, carved wooden baits. What does this have to do with not being a fly fisherman? Well, they tie flies and several people I know have been showing off their flies. What happens when their beautiful work inspires you? I decided since I can’t tie flies, to revisit my youth, carve a quick top water bait and show folks how it’s done including a paint job.
Living where I do cedar is almost considered a weed. It is everywhere and either free or cheap. I make a type of cedar box so I always have plenty of aged stock on hand. The good part about baits, being small you can use scrap wood that normally goes to waste.I grabbed a cutoff laying in the shop and split it using a hammer and wood chisel. Then headed over to the band saw to get rid of the sap wood and start shaping.

 This bait is 5 inches long.
This bait is a simple cigar shape used for the walking the dog technique. Once it is roughed out on the saw I move to the belt/disc sander for final shaping. This could be done on a lathe but I want it to be less than perfect, showing it is hand made, plus I can have it done by the time I get a lathe set up. I just eyeball the shape, adjusting with the sander until it is very close to what I want. After the sander I use 3 different grits of sand paper to hand sand it into the final shape. Usually from 100 to 220 grit paper.

After sanding I used the drill press to drill a hole large enough to hold the weight I add to the rear of the bait to make it tail heavy. I used a bullet sinker that I put on the anvil and whacked with a hammer to slightly flatten it. I used a Dremel tool to shape the hole to get a good fit. You can do this with a sharp knife or Exacto, too. After the weight was below the level of the wood I used CA glue to hold it in place. I used 2 part epoxy to overfill the hole slightly. Push this into any voids around the sinker and make sure it is just higher than the wood. It takes a little more sanding but works as a filler and sealer. After it dries, sand it down to match the contours of the cedar. For this I use fingernail files I get from a beauty supply store. Now to seal and paint.

At this point add your attachment points for line and hooks, remember you need something to hang onto while painting and to hang them by while they dry, so add one at least. I use an inexpensive primer most of the time but a good wood sealer isn’t a bad idea. Once the sealer is dry prime the bait using flat white. This keeps your colors from becoming muted as it does with grey or black. If you want your scales to be edged in black then you have to lay black down first.
Painting is as simple or as complex as your imagination, ability and equipment will allow. I painted many a productive bait with a brush or can of spray paint. This one is going to be painted with three techniques. I will use spray cans for the first two colors, airbrush the next few colors and then add eyes and gills with a brush. Then I seal everything with a polyurethane spar varnish, again from a spray can. This stuff gives a good high gloss, helps protect from exposure to sun and water and is a snap to apply.
After deciding I wanted this one to be in a golden shiner pattern I laid out what I needed. I used an almond base simply because it was what I had on hand. After this dried I painted the entire bait silver, again with a spray can. I allowed this to dry for a couple of hours before starting with the airbrush. I like to use transparent airbrush ready paint and there are several good brands out there. Some people use lacquers or taxidermy paints but I like using water based. I paint with a Paasche VL double action airbrush and a Badger airbrush compressor, this setup works great for whenever I need an airbrush.

I used a piece of tulle that I have mounted in a cardboard frame to add the scales. I leave some slack in the material to allow me to make it form to the bait by pushing it until tight. I used a transparent pink along each side leaving the bottom silver, this is the only step where the tulle is used.. After this dried I mixed transparent yellow and Indian red to get a light yellowish/bronze color. This is blended into the top of the scales and then painted solid across the top of the bait. I added more of the Indian red to darken the color and painted the top of the bait. I let this dry and decided to add a bit more of the red to darken it again and painted this along the center of the back.


After painting the main colors all that is left is detail. I went with hand painting these to keep with the hand made theme. You can buy eyes in many different styles which work great if you are one of those folks that has to have everything perfect. I painted black circles for the eyes and kill spots with a simple crescent shape for the gills. I painted the center of the eye with yellow leaving a bit of black showing around the edge then added a fat crescent shape for the pupil. All that is left is coating everything repeatedly with the spar polyurethane. I let this dry until it is just a little tacky and add another layer. Most baits get around 5-6 coats.
 Will there it is. Hand carved cedar top water baits. I make several versions of this in whatever sizes someone wants. Since they are all custom painted I can have tons of colors and patterns. Just think them up and get them painted.

Disclaimer: I was not compensated by any of the brands mentioned in this article.
Brian came up with a couple of slab sided designs that we caught quite a few fish on in our favorite pond in Shelby Park. This 5 acre pond in the middle of East Nashville was our training grounds, test facility and, just so happened, to hold some really big bass. We learned to cast bait casters there, tried all of the techniques we found in the books and caught many a big fish where people thought there was nothing but little bluegill. I caught my first 2 pound bass in the moat like channel that surrounds the lone island. When we carved a new bait this was the first place it hit the water.
Time went on, our income increased so the need to carve baits wasn’t an issue. We had tackle boxes full of everything we wanted so our carving days pretty much ended. Still over time I repaired, repainted and at times, carved wooden baits. What does this have to do with not being a fly fisherman? Well, they tie flies and several people I know have been showing off their flies. What happens when their beautiful work inspires you? I decided since I can’t tie flies, to revisit my youth, carve a quick top water bait and show folks how it’s done including a paint job.
Living where I do cedar is almost considered a weed. It is everywhere and either free or cheap. I make a type of cedar box so I always have plenty of aged stock on hand. The good part about baits, being small you can use scrap wood that normally goes to waste.I grabbed a cutoff laying in the shop and split it using a hammer and wood chisel. Then headed over to the band saw to get rid of the sap wood and start shaping.


This bait is a simple cigar shape used for the walking the dog technique. Once it is roughed out on the saw I move to the belt/disc sander for final shaping. This could be done on a lathe but I want it to be less than perfect, showing it is hand made, plus I can have it done by the time I get a lathe set up. I just eyeball the shape, adjusting with the sander until it is very close to what I want. After the sander I use 3 different grits of sand paper to hand sand it into the final shape. Usually from 100 to 220 grit paper.

After sanding I used the drill press to drill a hole large enough to hold the weight I add to the rear of the bait to make it tail heavy. I used a bullet sinker that I put on the anvil and whacked with a hammer to slightly flatten it. I used a Dremel tool to shape the hole to get a good fit. You can do this with a sharp knife or Exacto, too. After the weight was below the level of the wood I used CA glue to hold it in place. I used 2 part epoxy to overfill the hole slightly. Push this into any voids around the sinker and make sure it is just higher than the wood. It takes a little more sanding but works as a filler and sealer. After it dries, sand it down to match the contours of the cedar. For this I use fingernail files I get from a beauty supply store. Now to seal and paint.

At this point add your attachment points for line and hooks, remember you need something to hang onto while painting and to hang them by while they dry, so add one at least. I use an inexpensive primer most of the time but a good wood sealer isn’t a bad idea. Once the sealer is dry prime the bait using flat white. This keeps your colors from becoming muted as it does with grey or black. If you want your scales to be edged in black then you have to lay black down first.
Painting is as simple or as complex as your imagination, ability and equipment will allow. I painted many a productive bait with a brush or can of spray paint. This one is going to be painted with three techniques. I will use spray cans for the first two colors, airbrush the next few colors and then add eyes and gills with a brush. Then I seal everything with a polyurethane spar varnish, again from a spray can. This stuff gives a good high gloss, helps protect from exposure to sun and water and is a snap to apply.
After deciding I wanted this one to be in a golden shiner pattern I laid out what I needed. I used an almond base simply because it was what I had on hand. After this dried I painted the entire bait silver, again with a spray can. I allowed this to dry for a couple of hours before starting with the airbrush. I like to use transparent airbrush ready paint and there are several good brands out there. Some people use lacquers or taxidermy paints but I like using water based. I paint with a Paasche VL double action airbrush and a Badger airbrush compressor, this setup works great for whenever I need an airbrush.

I used a piece of tulle that I have mounted in a cardboard frame to add the scales. I leave some slack in the material to allow me to make it form to the bait by pushing it until tight. I used a transparent pink along each side leaving the bottom silver, this is the only step where the tulle is used.. After this dried I mixed transparent yellow and Indian red to get a light yellowish/bronze color. This is blended into the top of the scales and then painted solid across the top of the bait. I added more of the Indian red to darken the color and painted the top of the bait. I let this dry and decided to add a bit more of the red to darken it again and painted this along the center of the back.


After painting the main colors all that is left is detail. I went with hand painting these to keep with the hand made theme. You can buy eyes in many different styles which work great if you are one of those folks that has to have everything perfect. I painted black circles for the eyes and kill spots with a simple crescent shape for the gills. I painted the center of the eye with yellow leaving a bit of black showing around the edge then added a fat crescent shape for the pupil. All that is left is coating everything repeatedly with the spar polyurethane. I let this dry until it is just a little tacky and add another layer. Most baits get around 5-6 coats.


Disclaimer: I was not compensated by any of the brands mentioned in this article.
Tuesday, February 1, 2011
Oak and Walnut Transformed
I got inspiration from my friend @funcfish on Twitter (look in the top right for a link to his site) and the fact that I had a pile of rods stacked in the corner. He did a budget rod rack that is very functional, so, I thought I would try to do one that is a bit fancier and more like furniture. The main reason is my rods are kept in my office/outdoors room and I wanted to see if I could make it nice enough to fit inside the house. This might not be a beginner’s project and while you can do it with hand tools, it is much easier with a room full of woodworking stuff.
Staying with his idea of using what was on hand, I headed to the wood shop after a little planning to see what was there. I picked out some antique oak that had been saved from an old barn. This stuff is hard as a rock and not a lot of fun to work with but there was enough of it and some boards needed to be used since they were cracking. There was some walnut laying there for a good contrast in color for the trim. You could use whatever you like to do this project, pine would be very easy to use. If you do use pine I would still use a hardwood for the pegs that hold things together. So, here we go.
 The choices, oak, poplar, cedar, walnut
Parts list
2 pieces - 5” x 42” x ¾”
2 pieces - 5” x 30” x ¾”
2 pieces - 2” x 10” x ¾”
2 pieces - ¾” x ¾”
4 pieces - 2 ½” x 1”x 1”
Wood glue
There are no nails or screws needed for this project.
After picking out the boards they were run through the planer to true the sides and get them down to ¾ inch thickness. These were then cut to length and ripped to width on the table saw to true the ends and edges. In woodworking terms this is S4S or surfaced on 4 sides.
 Don't try to take a pic while holding onto the board being planed.
 Don ripping boards to width.
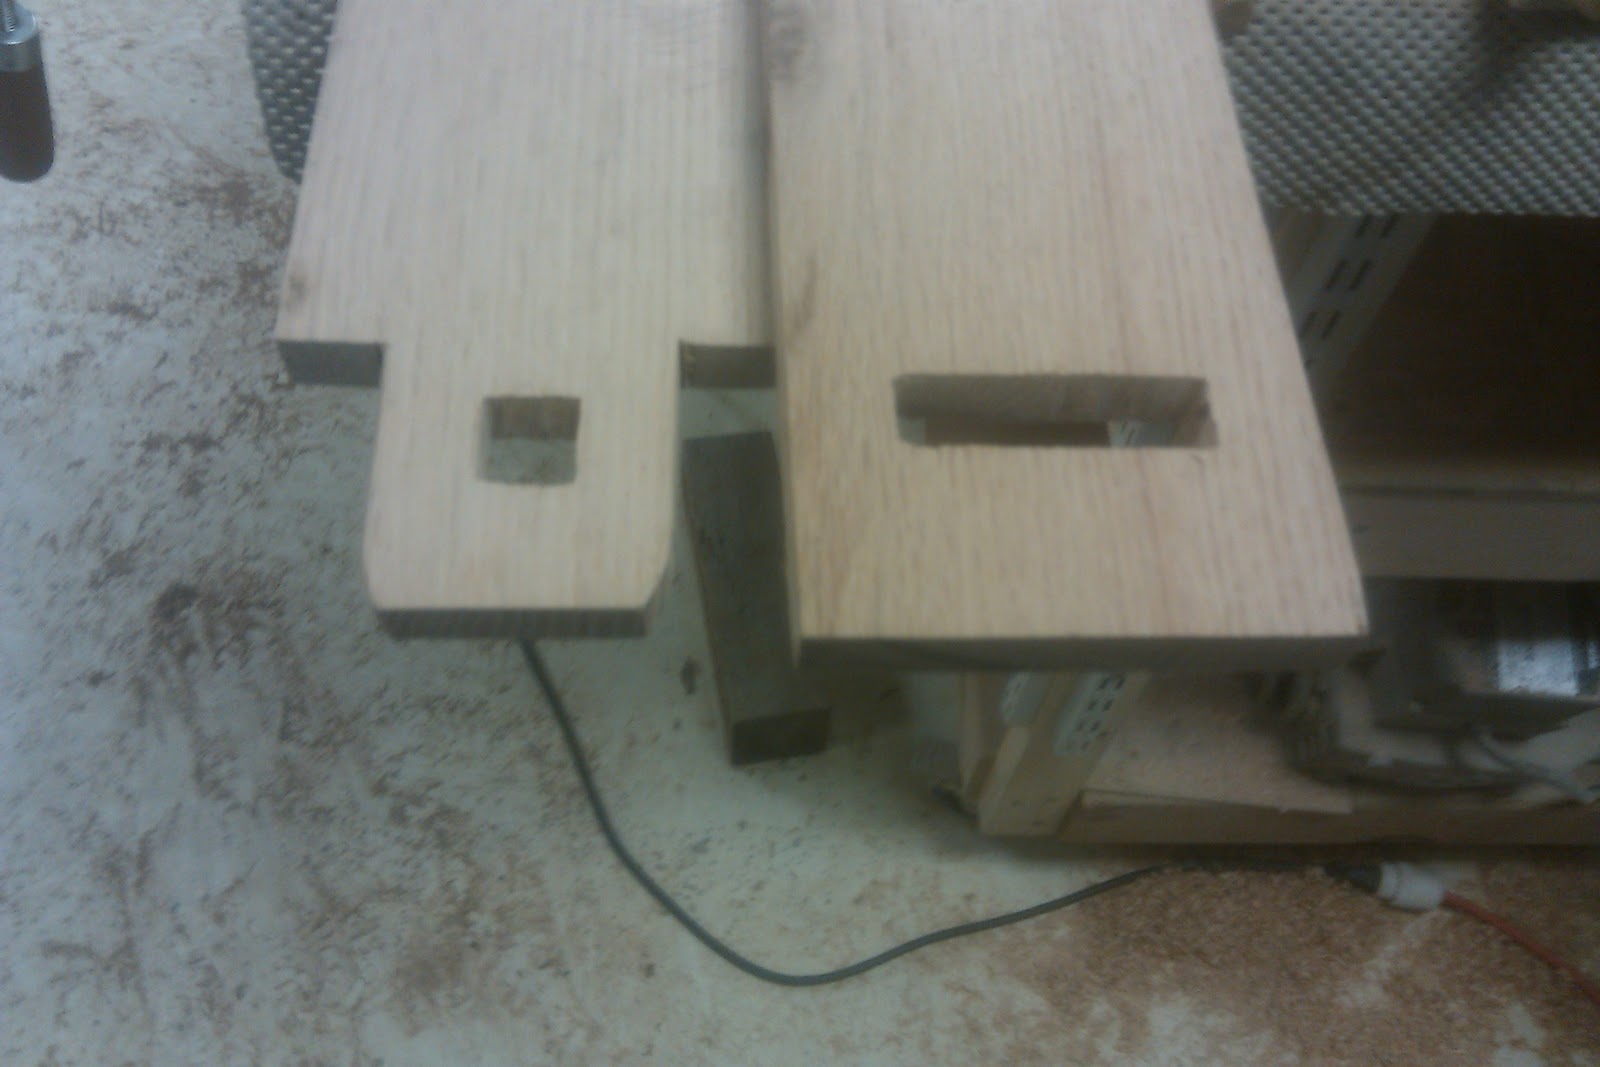
This project uses mortise and tenon joinery for the four main pieces and dowels for adding the feet. I laid out the tenons on the long boards. From the end measure back 3” and mark across the board. Then measure in from each side 1” and cut these pieces out leaving a tenon 3”x3”. I used a band saw but a jig saw would work or a hand saw if you take your time. For the mortise measure in 1” from each side of the tenon, from the end of the tenon measure back 1 ¼” and make a mark then another at 2 3/8”. This should give you a rectangle one inch by one and an eighth. Check to be sure the mortise is 5/8” from the back of the tenon it needs to be inside the vertical board, you will see why later. Repeat this on the ends of both long boards. You should have two boards measuring 42” with a 3” tenon on each end leaving a section in the middle measuring 36” from tenon to tenon.
 Tenon cut on band saw. Note the mortise laid out on board.
 The crappy mortiser.
 This is what you end up with before trueing with files.
For the shorter end boards you need a mortise near each end for the long boards to fit into. On one end measure in down 1”and mark across the board then measure down another ¾” and make another mark. Measure in from each side 1”. This should give you a rectangle ¾”x 3”. On the other end measure down 2” and then repeat the rest of the step above. Once all of the mortises are laid out I used a dedicated mortiser to remove the material. You could do the same thing by drilling holes near the corners then use a jig saw (I wish I had) which would have worked better than the junky mortiser I used.
Once all of the mortise and tenons are cut I needed to true them and fit each part together. This is done with a set of woodworker’s files and rasps. Decide which side is up on the long boards and always test your fit with the same tenon going into the same mortise. I numbered mine and marked the top to be sure I didn’t mix them up. On the short boards the mortise that is 1” from the end is the bottom and will have the foot attached later.
 Cleaning up the mortise with a file.
 Top shelf being test fitted.
After fitting the pieces I picked the walnut I was using for trim. Instead of drilling shallow holes into the bottom to accept the rod handles I decided to add a raised piece of trim measuring ¾” x ¾” along the front and back edge of the bottom shelf. These were cut long, glued then clamped in place to dry. Be sure the edges line up as best as you can to cut down on sanding later. But if they are off a bit sanding blends them so don’t worry too much, just get them as close as you can. After they dry I cut the trim to length using a Japanese trim saw. While these are drying you can work on the sides, feet and trim for the top.
 Prepping the walnut.
 Clamped and waiting for glue to dry on walnut trim.
I made the pattern for the feet using a scrap piece of wood but you could use cardboard. I drew the pattern on the scrap, cut it close on the band saw then finished it on the oscillating drum sander. This was used to transfer the shape to the ends of the feet. Use double sided tape to hold the feet together then cut the excess away on the band saw. Using the oscillating sander I sanded down to the line making the feet match. These are attached to the end boards using wooden dowels. Find the center of the side piece and the center of the foot. Measure out from the center 1 ¾” toward the edge and drill a hole in the center of the board one size larger than the dowel. I used the bit to enlarge and taper the hole to give me some wiggle room in making them fit. Cut the dowels to length, add glue and attach the foot to the side. I used bar clamps to draw everything together. Again try to get things as even as you can to cut down on sanding.


I wanted a piece of walnut trim on the top of the ends to give them a finished look. I cut two pieces of walnut 5 ¼” long x ¾” square. I glued these to the tops, clamping them with bar clamps till dry. After they were dried I drew a radius on the top corners and I will sand to the line, giving them a nice curve instead of sharp corners.
To hold everything together you need 4 wedges, which I made out of a scrap of walnut. I cut them into 1” squares 2 ½” long then shaped them on the belt/disc sander. You need to add a taper to one side so that as it tightens it will push everything together. Take your time and test fit these frequently to be sure you get a good fit and don’t take off too much material. This piece really needs to be made from hardwood even if you chose to work with pine for the rest of the boards.
 Cutting the wedges on the band saw.
 Testing the wedges. Look close on top of wedge you will see it is numbered.
I was planning to finish this in one post but things got in the way. Here is a shot of the almost finished piece. I still need to drill holes for the rods, cut slots back to the holes, make walnut pegs to hold rods in place, finish sanding and add finish. This sounds like a lot but it really isn’t but other things have kept me from getting it done. I will get it finished up in a few days and post the last few steps and pictures of the finished piece.

Staying with his idea of using what was on hand, I headed to the wood shop after a little planning to see what was there. I picked out some antique oak that had been saved from an old barn. This stuff is hard as a rock and not a lot of fun to work with but there was enough of it and some boards needed to be used since they were cracking. There was some walnut laying there for a good contrast in color for the trim. You could use whatever you like to do this project, pine would be very easy to use. If you do use pine I would still use a hardwood for the pegs that hold things together. So, here we go.

Parts list
2 pieces - 5” x 42” x ¾”
2 pieces - 5” x 30” x ¾”
2 pieces - 2” x 10” x ¾”
2 pieces - ¾” x ¾”
4 pieces - 2 ½” x 1”x 1”
Wood glue
There are no nails or screws needed for this project.
After picking out the boards they were run through the planer to true the sides and get them down to ¾ inch thickness. These were then cut to length and ripped to width on the table saw to true the ends and edges. In woodworking terms this is S4S or surfaced on 4 sides.


This project uses mortise and tenon joinery for the four main pieces and dowels for adding the feet. I laid out the tenons on the long boards. From the end measure back 3” and mark across the board. Then measure in from each side 1” and cut these pieces out leaving a tenon 3”x3”. I used a band saw but a jig saw would work or a hand saw if you take your time. For the mortise measure in 1” from each side of the tenon, from the end of the tenon measure back 1 ¼” and make a mark then another at 2 3/8”. This should give you a rectangle one inch by one and an eighth. Check to be sure the mortise is 5/8” from the back of the tenon it needs to be inside the vertical board, you will see why later. Repeat this on the ends of both long boards. You should have two boards measuring 42” with a 3” tenon on each end leaving a section in the middle measuring 36” from tenon to tenon.


For the shorter end boards you need a mortise near each end for the long boards to fit into. On one end measure in down 1”and mark across the board then measure down another ¾” and make another mark. Measure in from each side 1”. This should give you a rectangle ¾”x 3”. On the other end measure down 2” and then repeat the rest of the step above. Once all of the mortises are laid out I used a dedicated mortiser to remove the material. You could do the same thing by drilling holes near the corners then use a jig saw (I wish I had) which would have worked better than the junky mortiser I used.
Once all of the mortise and tenons are cut I needed to true them and fit each part together. This is done with a set of woodworker’s files and rasps. Decide which side is up on the long boards and always test your fit with the same tenon going into the same mortise. I numbered mine and marked the top to be sure I didn’t mix them up. On the short boards the mortise that is 1” from the end is the bottom and will have the foot attached later.


After fitting the pieces I picked the walnut I was using for trim. Instead of drilling shallow holes into the bottom to accept the rod handles I decided to add a raised piece of trim measuring ¾” x ¾” along the front and back edge of the bottom shelf. These were cut long, glued then clamped in place to dry. Be sure the edges line up as best as you can to cut down on sanding later. But if they are off a bit sanding blends them so don’t worry too much, just get them as close as you can. After they dry I cut the trim to length using a Japanese trim saw. While these are drying you can work on the sides, feet and trim for the top.


I made the pattern for the feet using a scrap piece of wood but you could use cardboard. I drew the pattern on the scrap, cut it close on the band saw then finished it on the oscillating drum sander. This was used to transfer the shape to the ends of the feet. Use double sided tape to hold the feet together then cut the excess away on the band saw. Using the oscillating sander I sanded down to the line making the feet match. These are attached to the end boards using wooden dowels. Find the center of the side piece and the center of the foot. Measure out from the center 1 ¾” toward the edge and drill a hole in the center of the board one size larger than the dowel. I used the bit to enlarge and taper the hole to give me some wiggle room in making them fit. Cut the dowels to length, add glue and attach the foot to the side. I used bar clamps to draw everything together. Again try to get things as even as you can to cut down on sanding.


I wanted a piece of walnut trim on the top of the ends to give them a finished look. I cut two pieces of walnut 5 ¼” long x ¾” square. I glued these to the tops, clamping them with bar clamps till dry. After they were dried I drew a radius on the top corners and I will sand to the line, giving them a nice curve instead of sharp corners.
To hold everything together you need 4 wedges, which I made out of a scrap of walnut. I cut them into 1” squares 2 ½” long then shaped them on the belt/disc sander. You need to add a taper to one side so that as it tightens it will push everything together. Take your time and test fit these frequently to be sure you get a good fit and don’t take off too much material. This piece really needs to be made from hardwood even if you chose to work with pine for the rest of the boards.


I was planning to finish this in one post but things got in the way. Here is a shot of the almost finished piece. I still need to drill holes for the rods, cut slots back to the holes, make walnut pegs to hold rods in place, finish sanding and add finish. This sounds like a lot but it really isn’t but other things have kept me from getting it done. I will get it finished up in a few days and post the last few steps and pictures of the finished piece.

Overlooked, River Silver
I grew up in Nashville, actually , East Nashville, which let me have access to some of the large TVA lakes and dams that dot the state. Just outside of Nashville is Old Hickory and Percy Priest, both have been favorite stomping grounds since we were kids. Priest is a draw down impoundment, turbines below the dam only run a few weeks a year to pull the lake down to winter pool or if we have a lot of rain, enough to hold the level. Old Hickory is different, it runs 24 hours a day, providing electrical energy to the grid, the more power needed the more of it’s twelve turbines they run. This provides good fishing on both sides of the river just about whenever you feel the need to head that way. Rockfish (stripers), hybrids, catfish, sauger and a list of panfish are caught below the dam either from boats or the two catwalks, one on either side, built for fishermen.
 Percy Preist in the summer. You might call this limited fishing opportunities.
I loaded up the boat to try for rockfish and cats one warm Saturday afternoon during mid summer. No wind and a partly cloudy sky promised a good evening on the river. I got to the ramp at Old Hickory, which I hate, it is extremely steep, long and narrow, got the boat launched, then headed upstream to the dam. The turbines are on the left side going upstream with flood gates in the center and the lock on the right. Underwater downstream of the flood gates are large rock piles that hold fish but steal terminal tackle at an astounding rate. There is a good current break where the turbines meet the flood gates, this break flows down the edge of these rock piles at mid river, this is where rockfish and cats cruise.
 Gary Hanson with a nice rockfish from Alabama. One of the fish we were after. Photo credit: Gary Hanson
 I was at the far end of the turbines. This view is from the fishermens' catwalk.
I pulled up to the face of the dam where the current break begins, we rigged heavy jigs and started casting into water flowing fast from the turbines. This provided good exercise but no strikes so I started wondering what I needed to change. I was tied to the corner of the dam in an eddy and noticed something running shad along the front of the flood gates in the slack current. Stripe (white bass) do this all the time and I sure don’t mind catching them, I’ve caught big stripe in this spot, so my decision was made.
I rigged a 6 ½ foot spinning rod with a #7 Countdown Rapala, another with a white ¼ oz Roostertail and started casting where I could see strikes. It only took a couple of casts for the rod to bend to the handle and a fight to start. After a few seconds a silver rocket came out of the river, back arched, mouth open, twisting and throwing spray. My fishing partner throws into the same spot and gets the same results, now two skipjacks are putting on a show like miniature tarpon, at times several feet in the air. Landing a 2 pound skipjack, I smiled, forgot about what I had come to the river to catch, made another cast and held on.
 Tennessee tarpon. Great fighters and almost completely overlooked.
Skipjack are called Tennessee tarpon around here and have earned their name. Besides being some of the best live or dead bait, they are an absolute blast to catch. Every evening during warmer weather they move along the dam and riprap assaulting baitfish. This particular evening they were moving, along with schools of stripe, against the dam face keeping shad pushed to the surface. All along the walls shad were jumping out of the water trying to shake the predators. All I needed to do was follow along with my trolling motor, casting past the splashes, then retrieving through the school. Very few casts went without a strike.
We had hit after hit from stripe and skips, spinning rods bent, reels screaming from the strain as good fish stripped line. We followed schools along concrete surfaces watching shad as they flew out of the river, onto the sloped face, flopping as they went from frying pan to fire. We weren’t the only ones that knew about this evening ritual, black crowned night herons and great blue herons, stood along the water’s edge waiting for shad to appear. They happily speared a shad supper they didn’t have to work for. The action continued, larger fish began showing up as light levels dropped. As bigger fish came in they got more aggressive, several times we had two large skipjack on one bait, straining the poor light rods and eight pound test we were using.
As dusk set in the action slowed, so under the sodium lights illuminating the river from the dam, we rigged up for catfish with a fresh stock of bait. With a live well full of stripe, any cats would be bonus fish. Darkness came and we drifted the current break with a breeze created by water from under the dam rushing by cooling us and keeping the skeeters at bay. We did manage to catch a couple of good cats that night, one blue going about 8 pounds, before packing it in. If we hadn’t seen a cat that night it wouldn’t have mattered, stripe and skipjack had given us a great time.
When I lived close enough to run out in the afternoons many times I went just for the skipjack. I would fish the lock side of the river since it has less current, waiting for the schools to start running the banks late in the day. I use several baits to catch skips, jig and twister combos, Roostertails, #7 Countdowns, anything 1 ½ to 2 inches in length mimicking a shad works. 6 ½ to 7 ½ foot spinning rods with 8 to 10 pound test is all you need. These are fish that so many people never fish for and I love to catch, they are incredible fighters and provide bait for my catfishing trips.
Skipjacks are simply one of the best baits for cats and stripers, either live, cut into chunks or whole, they are great and free. I get as many as I can and freeze them, guts in one bag and fillets in another for later use. Most people use a cast net and it works like a champ. There are several guys from Viet Nam and Laos I’ve met that net big numbers of skips and big gizzard shad to eat. They cut the bellies out leaving a really nice fish which they stack into boxes, the bellies and innards go into a bucket. They will gladly give you the insides which saves me time on those days if I just want to catfish and they are at the river.
Keeping with my theme of having fun outdoors, not making it work like tournament fishing or big time deer management, I have no problem fishing for species most people turn their nose up to if you mention fishing for them. I am out to enjoy whatever time I get plus I need skipjack to help fill my freezer and those of needy families I bring food during the year. In many areas skipjack are plentiful, almost completely overlooked, great bait and better fighters. Do I even need to say it?
Go out and give these guys a try. What a fun way to spend a summer afternoon, rod bent double, drag screaming, silver in the air throwing spray and a smile on your face.

I loaded up the boat to try for rockfish and cats one warm Saturday afternoon during mid summer. No wind and a partly cloudy sky promised a good evening on the river. I got to the ramp at Old Hickory, which I hate, it is extremely steep, long and narrow, got the boat launched, then headed upstream to the dam. The turbines are on the left side going upstream with flood gates in the center and the lock on the right. Underwater downstream of the flood gates are large rock piles that hold fish but steal terminal tackle at an astounding rate. There is a good current break where the turbines meet the flood gates, this break flows down the edge of these rock piles at mid river, this is where rockfish and cats cruise.


I pulled up to the face of the dam where the current break begins, we rigged heavy jigs and started casting into water flowing fast from the turbines. This provided good exercise but no strikes so I started wondering what I needed to change. I was tied to the corner of the dam in an eddy and noticed something running shad along the front of the flood gates in the slack current. Stripe (white bass) do this all the time and I sure don’t mind catching them, I’ve caught big stripe in this spot, so my decision was made.
I rigged a 6 ½ foot spinning rod with a #7 Countdown Rapala, another with a white ¼ oz Roostertail and started casting where I could see strikes. It only took a couple of casts for the rod to bend to the handle and a fight to start. After a few seconds a silver rocket came out of the river, back arched, mouth open, twisting and throwing spray. My fishing partner throws into the same spot and gets the same results, now two skipjacks are putting on a show like miniature tarpon, at times several feet in the air. Landing a 2 pound skipjack, I smiled, forgot about what I had come to the river to catch, made another cast and held on.

Skipjack are called Tennessee tarpon around here and have earned their name. Besides being some of the best live or dead bait, they are an absolute blast to catch. Every evening during warmer weather they move along the dam and riprap assaulting baitfish. This particular evening they were moving, along with schools of stripe, against the dam face keeping shad pushed to the surface. All along the walls shad were jumping out of the water trying to shake the predators. All I needed to do was follow along with my trolling motor, casting past the splashes, then retrieving through the school. Very few casts went without a strike.
We had hit after hit from stripe and skips, spinning rods bent, reels screaming from the strain as good fish stripped line. We followed schools along concrete surfaces watching shad as they flew out of the river, onto the sloped face, flopping as they went from frying pan to fire. We weren’t the only ones that knew about this evening ritual, black crowned night herons and great blue herons, stood along the water’s edge waiting for shad to appear. They happily speared a shad supper they didn’t have to work for. The action continued, larger fish began showing up as light levels dropped. As bigger fish came in they got more aggressive, several times we had two large skipjack on one bait, straining the poor light rods and eight pound test we were using.
As dusk set in the action slowed, so under the sodium lights illuminating the river from the dam, we rigged up for catfish with a fresh stock of bait. With a live well full of stripe, any cats would be bonus fish. Darkness came and we drifted the current break with a breeze created by water from under the dam rushing by cooling us and keeping the skeeters at bay. We did manage to catch a couple of good cats that night, one blue going about 8 pounds, before packing it in. If we hadn’t seen a cat that night it wouldn’t have mattered, stripe and skipjack had given us a great time.
When I lived close enough to run out in the afternoons many times I went just for the skipjack. I would fish the lock side of the river since it has less current, waiting for the schools to start running the banks late in the day. I use several baits to catch skips, jig and twister combos, Roostertails, #7 Countdowns, anything 1 ½ to 2 inches in length mimicking a shad works. 6 ½ to 7 ½ foot spinning rods with 8 to 10 pound test is all you need. These are fish that so many people never fish for and I love to catch, they are incredible fighters and provide bait for my catfishing trips.
Skipjacks are simply one of the best baits for cats and stripers, either live, cut into chunks or whole, they are great and free. I get as many as I can and freeze them, guts in one bag and fillets in another for later use. Most people use a cast net and it works like a champ. There are several guys from Viet Nam and Laos I’ve met that net big numbers of skips and big gizzard shad to eat. They cut the bellies out leaving a really nice fish which they stack into boxes, the bellies and innards go into a bucket. They will gladly give you the insides which saves me time on those days if I just want to catfish and they are at the river.
Keeping with my theme of having fun outdoors, not making it work like tournament fishing or big time deer management, I have no problem fishing for species most people turn their nose up to if you mention fishing for them. I am out to enjoy whatever time I get plus I need skipjack to help fill my freezer and those of needy families I bring food during the year. In many areas skipjack are plentiful, almost completely overlooked, great bait and better fighters. Do I even need to say it?
Go out and give these guys a try. What a fun way to spend a summer afternoon, rod bent double, drag screaming, silver in the air throwing spray and a smile on your face.
Subscribe to:
Posts (Atom)
About Me

- Tommy Ellis
- Born and raised in middle Tennessee.I'm a working wildlife and landscape artist specializing in watercolors. Now making cedar lures and custom turkey calls.

