
Showing posts with label rod rack. Show all posts
Showing posts with label rod rack. Show all posts
Monday, April 4, 2011
Oak and Walnut Transformed Pt 2
Well after a delay longer than I planned I finally got to finish up my rod rack. Don’t know what I was waiting on since it only took about an hour to have it ready to put back together. Anyway here are the final few steps in our rod rack as furniture project.
I started with the idea to use scrap wood to do a budget build but my buddy over at http://www.funcfish.com/ beat me to it and did a great job so there was no need for me to do it again. This build used the same idea, materials already in the shop, yes I have a lot of stuff available, to create something nice enough to bring inside not leave in the garage. With the help of my neighbor’s shop and wood supply I was able to do this project for zero cost. All materials were leftovers from previous projects, wood rescued from various places or bulk buys from auctions at very low cost long since recouped.
Getting back into the shop I had to decide where to drill holes for rods to sit. I measured the top board from the end to find the exact middle then working toward each end, put a mark every 5 inches ending up with 7. There is no reason for putting them at this spacing other than it looked good. This spacing will allow me to add a series of holes on the other side if I want to add more rods. If I do I will offset the holes to provide more room for the reels on the lower shelf. I measured in from the edge 1 ½ inches and using a center punch made a small hole to guide a 1” forstner’s bit to drill each hole using a drill press. Be sure and drill from the top and put a board under your work piece to minimize tear out. By drilling from the top any tears will be hidden underneath. Next I cut a half inch slot for each hole using a square to guide my Japanese handsaw, you could use a jig saw or another type of handsaw but I have this one and it is great for cuts like this. This finished the top shelf except for a final sanding.

 Drill press with Forstner's bit and backer board. Oh and a cluttered workbench.
The trim added to the top of each side piece needed shaping on each corner plus the walnut was too wide and had to be sanded to blend with the oak. I shaped the corners on my bench top belt/disc sander, I had considered a bunch of ways to layout the curve but in the end just eyeballed it. To cut down the extra width I used a palm sander with 60 grit paper to get it close then switched to100 grit. I used 220 grit paper for a final sanding and to round over any edges on all of the pieces. Everything was wiped down with a tack cloth to remove dust to get ready for stain.
 Belt/disc sander and my Japanese saw. I love this saw it was sent from Tokyo by a friend.

To keep the contrast high between the two colors of wood I decided to use walnut stain on the trim pieces but just a natural stain on the oak. To do this I used a small cloth folded into a point to carefully apply stain to all trim pieces first. Take your time so you don’t get dark stain on the lighter oak. If you do lightly sand it using a small piece of 400 grit after the walnut stain dries so you don’t contaminate the trim pieces with dust. After the walnut is done I used a cloth to apply the natural stain to the oak. I like to use old t-shirts since they tend to be lint free and soft to keep the streaks down. This goes fast since I use a product that is stain and polyurethane in the same can.
 End details with walnut pegs in mortises.
The last step is to cut some small pieces of cedar to hold the rods in place, just in case. You could use more walnut which would look good but I was lazy and used a piece of cedar already milled to the size I needed I found laying on a work bench. I had several ideas on how to keep the rods in place but this one was the fastest so it won out. Each cedar piece was finished with the natural stain and there we have it, finally finished. I realized as I loaded the pictures I left these out but you get the idea.
 And finally the finished piece.
This is an old form of joinery which I have been fascinated with for years. The idea that simple friction will hold a piece of furniture together is just cool stuff. Yes it does take a bit of fitting but in the end you have no nails or screws to hide plus it can be taken apart if you have to move or ship it.
This rod rack can be built with nothing but a few hand tools and a bit of space to lay things out. I’m lucky to have access to tools, two shops and a large quantity of lumber but I have done things like this with much less. One bit of advice on lumber, if you look you might find a sawmill close that you never paid attention to. We make regular visits to several in our area and buy wood at a tiny fraction of what it would cost at a lumber yard or box store. It takes more work to get it ready to use but the savings are huge. Don and I just made three tables from wood saved from a burn pile at Trott’s Mill where a truck load cost us $10.00. Except for the attachments for the legs the cost was pennies for each one. These will sell in the $100.00 range for a total cost to us of under $5.00 each.
Hope you enjoyed a bit more woodworking, thanks for taking some time to check it out.
I started with the idea to use scrap wood to do a budget build but my buddy over at http://www.funcfish.com/ beat me to it and did a great job so there was no need for me to do it again. This build used the same idea, materials already in the shop, yes I have a lot of stuff available, to create something nice enough to bring inside not leave in the garage. With the help of my neighbor’s shop and wood supply I was able to do this project for zero cost. All materials were leftovers from previous projects, wood rescued from various places or bulk buys from auctions at very low cost long since recouped.
Getting back into the shop I had to decide where to drill holes for rods to sit. I measured the top board from the end to find the exact middle then working toward each end, put a mark every 5 inches ending up with 7. There is no reason for putting them at this spacing other than it looked good. This spacing will allow me to add a series of holes on the other side if I want to add more rods. If I do I will offset the holes to provide more room for the reels on the lower shelf. I measured in from the edge 1 ½ inches and using a center punch made a small hole to guide a 1” forstner’s bit to drill each hole using a drill press. Be sure and drill from the top and put a board under your work piece to minimize tear out. By drilling from the top any tears will be hidden underneath. Next I cut a half inch slot for each hole using a square to guide my Japanese handsaw, you could use a jig saw or another type of handsaw but I have this one and it is great for cuts like this. This finished the top shelf except for a final sanding.


The trim added to the top of each side piece needed shaping on each corner plus the walnut was too wide and had to be sanded to blend with the oak. I shaped the corners on my bench top belt/disc sander, I had considered a bunch of ways to layout the curve but in the end just eyeballed it. To cut down the extra width I used a palm sander with 60 grit paper to get it close then switched to100 grit. I used 220 grit paper for a final sanding and to round over any edges on all of the pieces. Everything was wiped down with a tack cloth to remove dust to get ready for stain.


To keep the contrast high between the two colors of wood I decided to use walnut stain on the trim pieces but just a natural stain on the oak. To do this I used a small cloth folded into a point to carefully apply stain to all trim pieces first. Take your time so you don’t get dark stain on the lighter oak. If you do lightly sand it using a small piece of 400 grit after the walnut stain dries so you don’t contaminate the trim pieces with dust. After the walnut is done I used a cloth to apply the natural stain to the oak. I like to use old t-shirts since they tend to be lint free and soft to keep the streaks down. This goes fast since I use a product that is stain and polyurethane in the same can.

The last step is to cut some small pieces of cedar to hold the rods in place, just in case. You could use more walnut which would look good but I was lazy and used a piece of cedar already milled to the size I needed I found laying on a work bench. I had several ideas on how to keep the rods in place but this one was the fastest so it won out. Each cedar piece was finished with the natural stain and there we have it, finally finished. I realized as I loaded the pictures I left these out but you get the idea.

This is an old form of joinery which I have been fascinated with for years. The idea that simple friction will hold a piece of furniture together is just cool stuff. Yes it does take a bit of fitting but in the end you have no nails or screws to hide plus it can be taken apart if you have to move or ship it.
This rod rack can be built with nothing but a few hand tools and a bit of space to lay things out. I’m lucky to have access to tools, two shops and a large quantity of lumber but I have done things like this with much less. One bit of advice on lumber, if you look you might find a sawmill close that you never paid attention to. We make regular visits to several in our area and buy wood at a tiny fraction of what it would cost at a lumber yard or box store. It takes more work to get it ready to use but the savings are huge. Don and I just made three tables from wood saved from a burn pile at Trott’s Mill where a truck load cost us $10.00. Except for the attachments for the legs the cost was pennies for each one. These will sell in the $100.00 range for a total cost to us of under $5.00 each.
Hope you enjoyed a bit more woodworking, thanks for taking some time to check it out.


Tuesday, February 1, 2011
Oak and Walnut Transformed
I got inspiration from my friend @funcfish on Twitter (look in the top right for a link to his site) and the fact that I had a pile of rods stacked in the corner. He did a budget rod rack that is very functional, so, I thought I would try to do one that is a bit fancier and more like furniture. The main reason is my rods are kept in my office/outdoors room and I wanted to see if I could make it nice enough to fit inside the house. This might not be a beginner’s project and while you can do it with hand tools, it is much easier with a room full of woodworking stuff.
Staying with his idea of using what was on hand, I headed to the wood shop after a little planning to see what was there. I picked out some antique oak that had been saved from an old barn. This stuff is hard as a rock and not a lot of fun to work with but there was enough of it and some boards needed to be used since they were cracking. There was some walnut laying there for a good contrast in color for the trim. You could use whatever you like to do this project, pine would be very easy to use. If you do use pine I would still use a hardwood for the pegs that hold things together. So, here we go.
 The choices, oak, poplar, cedar, walnut
Parts list
2 pieces - 5” x 42” x ¾”
2 pieces - 5” x 30” x ¾”
2 pieces - 2” x 10” x ¾”
2 pieces - ¾” x ¾”
4 pieces - 2 ½” x 1”x 1”
Wood glue
There are no nails or screws needed for this project.
After picking out the boards they were run through the planer to true the sides and get them down to ¾ inch thickness. These were then cut to length and ripped to width on the table saw to true the ends and edges. In woodworking terms this is S4S or surfaced on 4 sides.
 Don't try to take a pic while holding onto the board being planed.
 Don ripping boards to width.
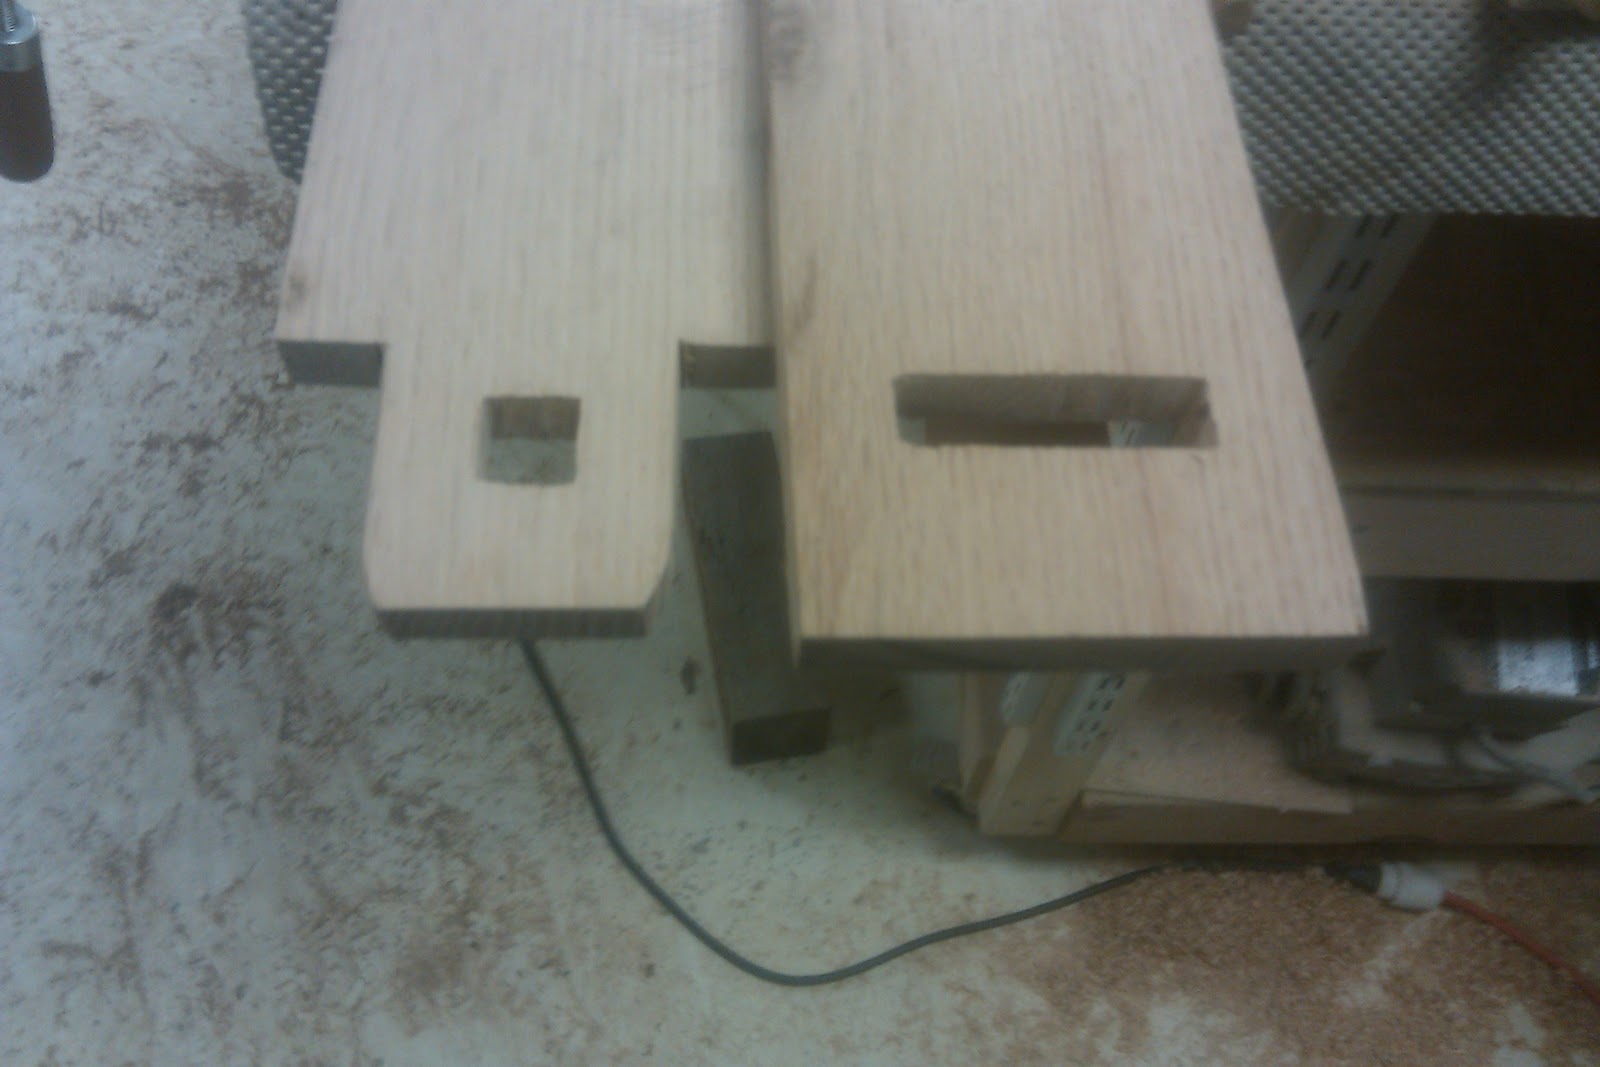
This project uses mortise and tenon joinery for the four main pieces and dowels for adding the feet. I laid out the tenons on the long boards. From the end measure back 3” and mark across the board. Then measure in from each side 1” and cut these pieces out leaving a tenon 3”x3”. I used a band saw but a jig saw would work or a hand saw if you take your time. For the mortise measure in 1” from each side of the tenon, from the end of the tenon measure back 1 ¼” and make a mark then another at 2 3/8”. This should give you a rectangle one inch by one and an eighth. Check to be sure the mortise is 5/8” from the back of the tenon it needs to be inside the vertical board, you will see why later. Repeat this on the ends of both long boards. You should have two boards measuring 42” with a 3” tenon on each end leaving a section in the middle measuring 36” from tenon to tenon.
 Tenon cut on band saw. Note the mortise laid out on board.
 The crappy mortiser.
 This is what you end up with before trueing with files.
For the shorter end boards you need a mortise near each end for the long boards to fit into. On one end measure in down 1”and mark across the board then measure down another ¾” and make another mark. Measure in from each side 1”. This should give you a rectangle ¾”x 3”. On the other end measure down 2” and then repeat the rest of the step above. Once all of the mortises are laid out I used a dedicated mortiser to remove the material. You could do the same thing by drilling holes near the corners then use a jig saw (I wish I had) which would have worked better than the junky mortiser I used.
Once all of the mortise and tenons are cut I needed to true them and fit each part together. This is done with a set of woodworker’s files and rasps. Decide which side is up on the long boards and always test your fit with the same tenon going into the same mortise. I numbered mine and marked the top to be sure I didn’t mix them up. On the short boards the mortise that is 1” from the end is the bottom and will have the foot attached later.
 Cleaning up the mortise with a file.
 Top shelf being test fitted.
After fitting the pieces I picked the walnut I was using for trim. Instead of drilling shallow holes into the bottom to accept the rod handles I decided to add a raised piece of trim measuring ¾” x ¾” along the front and back edge of the bottom shelf. These were cut long, glued then clamped in place to dry. Be sure the edges line up as best as you can to cut down on sanding later. But if they are off a bit sanding blends them so don’t worry too much, just get them as close as you can. After they dry I cut the trim to length using a Japanese trim saw. While these are drying you can work on the sides, feet and trim for the top.
 Prepping the walnut.
 Clamped and waiting for glue to dry on walnut trim.
I made the pattern for the feet using a scrap piece of wood but you could use cardboard. I drew the pattern on the scrap, cut it close on the band saw then finished it on the oscillating drum sander. This was used to transfer the shape to the ends of the feet. Use double sided tape to hold the feet together then cut the excess away on the band saw. Using the oscillating sander I sanded down to the line making the feet match. These are attached to the end boards using wooden dowels. Find the center of the side piece and the center of the foot. Measure out from the center 1 ¾” toward the edge and drill a hole in the center of the board one size larger than the dowel. I used the bit to enlarge and taper the hole to give me some wiggle room in making them fit. Cut the dowels to length, add glue and attach the foot to the side. I used bar clamps to draw everything together. Again try to get things as even as you can to cut down on sanding.


I wanted a piece of walnut trim on the top of the ends to give them a finished look. I cut two pieces of walnut 5 ¼” long x ¾” square. I glued these to the tops, clamping them with bar clamps till dry. After they were dried I drew a radius on the top corners and I will sand to the line, giving them a nice curve instead of sharp corners.
To hold everything together you need 4 wedges, which I made out of a scrap of walnut. I cut them into 1” squares 2 ½” long then shaped them on the belt/disc sander. You need to add a taper to one side so that as it tightens it will push everything together. Take your time and test fit these frequently to be sure you get a good fit and don’t take off too much material. This piece really needs to be made from hardwood even if you chose to work with pine for the rest of the boards.
 Cutting the wedges on the band saw.
 Testing the wedges. Look close on top of wedge you will see it is numbered.
I was planning to finish this in one post but things got in the way. Here is a shot of the almost finished piece. I still need to drill holes for the rods, cut slots back to the holes, make walnut pegs to hold rods in place, finish sanding and add finish. This sounds like a lot but it really isn’t but other things have kept me from getting it done. I will get it finished up in a few days and post the last few steps and pictures of the finished piece.

Staying with his idea of using what was on hand, I headed to the wood shop after a little planning to see what was there. I picked out some antique oak that had been saved from an old barn. This stuff is hard as a rock and not a lot of fun to work with but there was enough of it and some boards needed to be used since they were cracking. There was some walnut laying there for a good contrast in color for the trim. You could use whatever you like to do this project, pine would be very easy to use. If you do use pine I would still use a hardwood for the pegs that hold things together. So, here we go.

Parts list
2 pieces - 5” x 42” x ¾”
2 pieces - 5” x 30” x ¾”
2 pieces - 2” x 10” x ¾”
2 pieces - ¾” x ¾”
4 pieces - 2 ½” x 1”x 1”
Wood glue
There are no nails or screws needed for this project.
After picking out the boards they were run through the planer to true the sides and get them down to ¾ inch thickness. These were then cut to length and ripped to width on the table saw to true the ends and edges. In woodworking terms this is S4S or surfaced on 4 sides.


This project uses mortise and tenon joinery for the four main pieces and dowels for adding the feet. I laid out the tenons on the long boards. From the end measure back 3” and mark across the board. Then measure in from each side 1” and cut these pieces out leaving a tenon 3”x3”. I used a band saw but a jig saw would work or a hand saw if you take your time. For the mortise measure in 1” from each side of the tenon, from the end of the tenon measure back 1 ¼” and make a mark then another at 2 3/8”. This should give you a rectangle one inch by one and an eighth. Check to be sure the mortise is 5/8” from the back of the tenon it needs to be inside the vertical board, you will see why later. Repeat this on the ends of both long boards. You should have two boards measuring 42” with a 3” tenon on each end leaving a section in the middle measuring 36” from tenon to tenon.


For the shorter end boards you need a mortise near each end for the long boards to fit into. On one end measure in down 1”and mark across the board then measure down another ¾” and make another mark. Measure in from each side 1”. This should give you a rectangle ¾”x 3”. On the other end measure down 2” and then repeat the rest of the step above. Once all of the mortises are laid out I used a dedicated mortiser to remove the material. You could do the same thing by drilling holes near the corners then use a jig saw (I wish I had) which would have worked better than the junky mortiser I used.
Once all of the mortise and tenons are cut I needed to true them and fit each part together. This is done with a set of woodworker’s files and rasps. Decide which side is up on the long boards and always test your fit with the same tenon going into the same mortise. I numbered mine and marked the top to be sure I didn’t mix them up. On the short boards the mortise that is 1” from the end is the bottom and will have the foot attached later.


After fitting the pieces I picked the walnut I was using for trim. Instead of drilling shallow holes into the bottom to accept the rod handles I decided to add a raised piece of trim measuring ¾” x ¾” along the front and back edge of the bottom shelf. These were cut long, glued then clamped in place to dry. Be sure the edges line up as best as you can to cut down on sanding later. But if they are off a bit sanding blends them so don’t worry too much, just get them as close as you can. After they dry I cut the trim to length using a Japanese trim saw. While these are drying you can work on the sides, feet and trim for the top.


I made the pattern for the feet using a scrap piece of wood but you could use cardboard. I drew the pattern on the scrap, cut it close on the band saw then finished it on the oscillating drum sander. This was used to transfer the shape to the ends of the feet. Use double sided tape to hold the feet together then cut the excess away on the band saw. Using the oscillating sander I sanded down to the line making the feet match. These are attached to the end boards using wooden dowels. Find the center of the side piece and the center of the foot. Measure out from the center 1 ¾” toward the edge and drill a hole in the center of the board one size larger than the dowel. I used the bit to enlarge and taper the hole to give me some wiggle room in making them fit. Cut the dowels to length, add glue and attach the foot to the side. I used bar clamps to draw everything together. Again try to get things as even as you can to cut down on sanding.


I wanted a piece of walnut trim on the top of the ends to give them a finished look. I cut two pieces of walnut 5 ¼” long x ¾” square. I glued these to the tops, clamping them with bar clamps till dry. After they were dried I drew a radius on the top corners and I will sand to the line, giving them a nice curve instead of sharp corners.
To hold everything together you need 4 wedges, which I made out of a scrap of walnut. I cut them into 1” squares 2 ½” long then shaped them on the belt/disc sander. You need to add a taper to one side so that as it tightens it will push everything together. Take your time and test fit these frequently to be sure you get a good fit and don’t take off too much material. This piece really needs to be made from hardwood even if you chose to work with pine for the rest of the boards.


I was planning to finish this in one post but things got in the way. Here is a shot of the almost finished piece. I still need to drill holes for the rods, cut slots back to the holes, make walnut pegs to hold rods in place, finish sanding and add finish. This sounds like a lot but it really isn’t but other things have kept me from getting it done. I will get it finished up in a few days and post the last few steps and pictures of the finished piece.

Subscribe to:
Posts (Atom)

About Me

- Tommy Ellis
- Born and raised in middle Tennessee.I'm a working wildlife and landscape artist specializing in watercolors. Now making cedar lures and custom turkey calls.


